
Imagine your kitchen filled with the soothing scent of garlic and cheese richness that promises pleasure without the guilt. With my Cheesy Keto Cauliflower Garlic Breadsticks, you’ll get precisely that!
Not only are these tiny treasures gluten-free, but they also include all the flavor you want while being low-carb and keto-friendly.
You want a side dish that entices your taste senses rather than merely sitting on the plate after a hard day, and trust me when I say that you won’t have to compromise on delight here.
These delectable breadsticks can be prepared in just 7 minutes and are a great addition to any dinner or as a tasty snack on their own.
Therefore, these keto-friendly breadsticks will save the day and wow your visitors whether you’re throwing a dinner party or just trying to resist the temptation of fast food.
Prepare to enjoy every cheesy morsel!
Why should you try Cheesy Keto Cauliflower Garlic Breadsticks?
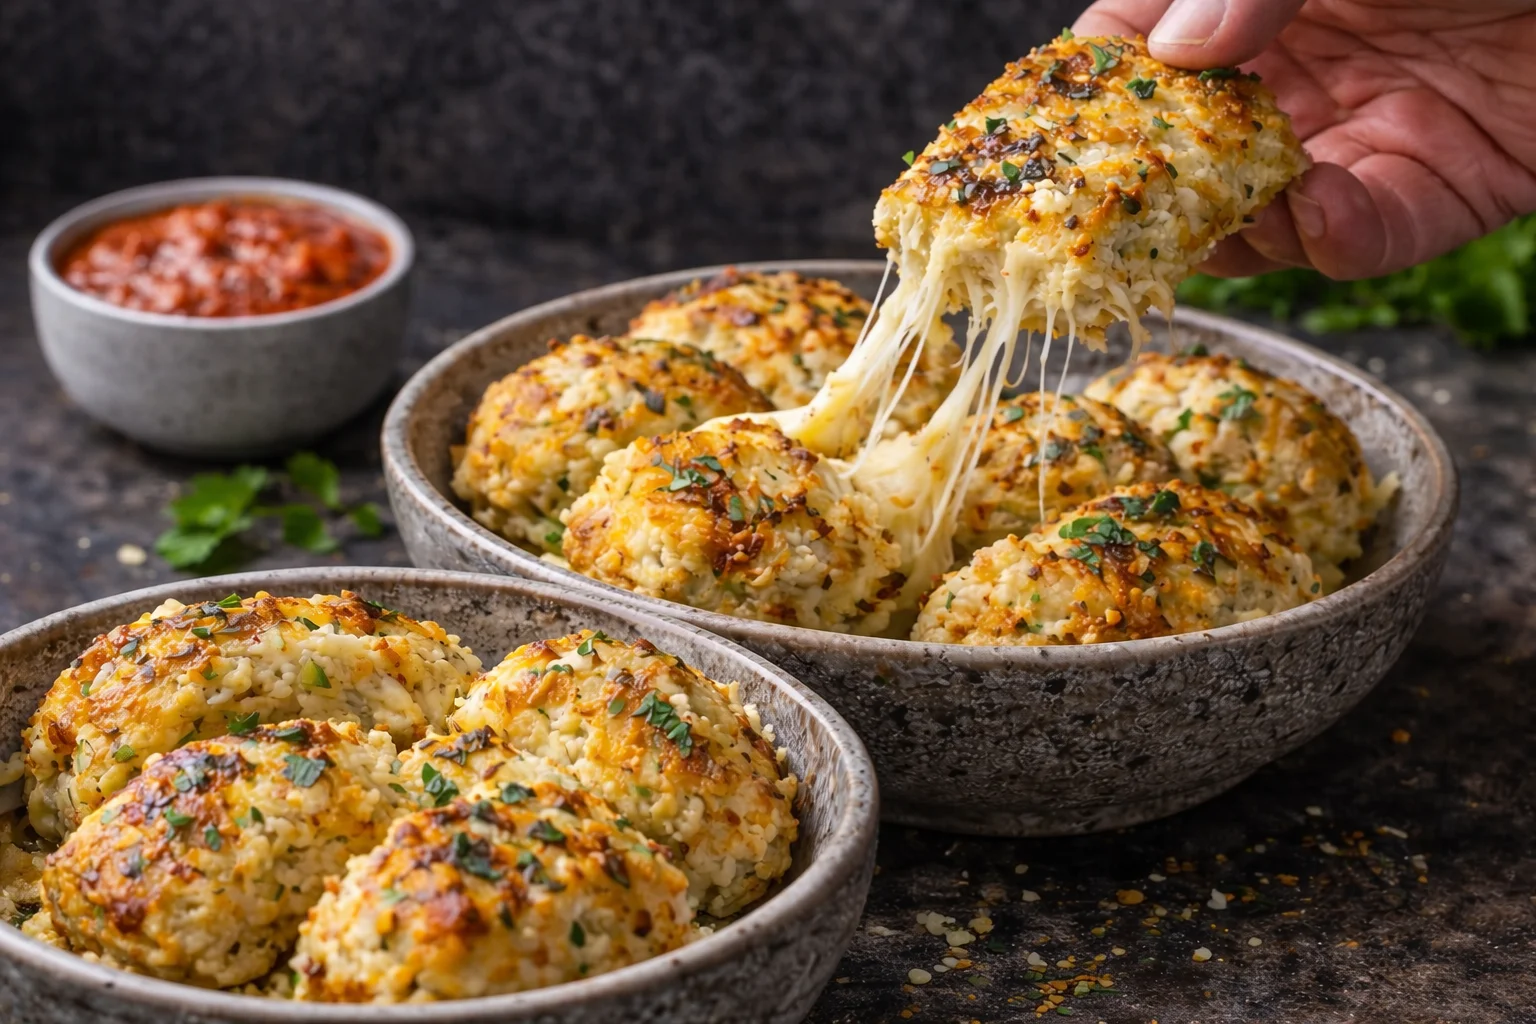
- Unstoppable aroma: The perfume of cheese and garlic pervades your house as you bake, making it hard to resist.
- Fast preparation time: You may have a tasty side dish without the hassle in only seven minutes.
- Satisfy cravings: By offering the most flavor and texture possible, these low-carb sticks help curb appetites for fast food.
- Versatile pairing: Make your supper a show-stopper by pairing them with spaghetti, soups, or just by themselves.
- Simple storage: You may enjoy these treats later because leftovers can be kept for up to two days.
Ingredients for Cheesy Keto Cauliflower Garlic Breadsticks
Regarding the Breadstick Base
- Cauliflower: The key component that gives these breadsticks their structure; to prevent sogginess, make sure it’s quite dry.
- Mozzarella Cheese: For a different flavor, feel free to replace it with Monterey Jack. It adds a creamy texture and nicely binds everything together.
- Parmesan Cheese: For optimal texture, use finely grated cheese to enhance the cheesy flavor.
- Egg: This ingredient is crucial for binding the batter and keeping the breadsticks together while baking.
Regarding the Taste
- Garlic (powdered or fresh): Powdered garlic can be used in an emergency, but fresh garlic is the best.
- Italian seasoning: If you don’t have pre-made seasoning on hand, combine dried oregano, basil, and thyme to create the ideal combination of herbs that enhances the flavor.
- Salt and pepper: These are basic but crucial seasonings that you can modify to suit your tastes.
You’ll want to cook these delicious low-carb Cheesy Keto Cauliflower Garlic Breadsticks again and again!
How to Prepare Cheesy Keto Breadsticks with Cauliflower and Garlic
Line a baking sheet with parchment paper and preheat the oven to 400°F (200°C).
Your breadsticks will bake evenly and not stick to the pan if you follow this step.
Cauliflower should be steamed or microwaved for five to seven minutes to make it soft.
A dry combination is essential, so drain completely using cheesecloth or a fresh kitchen towel to remove any remaining moisture.
In a mixing dish, mix together the dry cauliflower, mozzarella, Parmesan, egg, garlic, and Italian seasoning.
Mix thoroughly until all contents are evenly distributed and completely incorporated.
On the baking sheet that has been prepared, mold the batter into stick shapes, allowing enough space between each stick for even cooking.
This will aid in the development of a lovely golden-brown crust.
Bake for 20 minutes, watching closely for a nicely golden hue at the end.
When finished, they should feel firm to the touch.
For an additional flavor boost, brush right away after baking with melted garlic butter.
This step offers an irresistibly rich, delectable finish!
Enjoy every bite of your cheesy bliss and serve warm for the best flavor and delightful cheesy texture!
Serve with marinara sauce if desired for a delicious dipping experience.
Preparing Cheesy Keto Cauliflower Garlic Breadsticks in 7 minutes
Professional Advice for Cheesy Keto Garlic and Cauliflower Breadsticks
Drying is Crucial: After cooking, make sure your cauliflower is totally dry; too much moisture can result in soggy breadsticks.
It’s important to leave adequate space between each stick on your baking sheet to ensure even baking and a flawless golden crust.
Visual Check: Watch for doneness while they bake; they should be a beautiful golden color and firm to the touch.
Serve Fresh: It’s best to eat these delicious Keto Cauliflower Garlic Breadsticks warm. Any leftovers can be kept for up to two days in an airtight container.
Try Variations: To customize the flavors to your preferences, try experimenting with other cheese blends or seasonings; a little imagination goes a long way!
Variations of Cheesy Keto Cauliflower Garlic Breadsticks
Add flavor and flair to your Cheesy Keto Cauliflower Garlic Breadsticks with these tasty twists and substitutions!
Dairy-Free:
To achieve a comparable melty feel without lactose, use dairy-free cheese substitutes for mozzarella and Parmesan.
Vegan cheese:
Vegan cheese options have advanced significantly, offering a delicious taste and texture similarity. The difference won’t even be apparent to your guests!
Spicy Kick:
For extra heat, add jalapeños or red pepper flakes to the mixture.
Each mouthful will be a flaming treat thanks to this zesty version, which will excite your taste receptors and elevate the flavor profile!
Herb-Infused:
For a fragrant twist, add fresh herbs like basil or parsley.
With their vivid flavors, fresh herbs enhance the food and give your tongue a more lively experience.
Cheese Blends:
For a deeper, spicier cheese flavor, try combining cheddar and pepper jack.
This substitute adds a delicious kick and creates a melty, gooey experience that nicely complements the garlic fragrance!
Nutty Texture:
For an unexpected crunch, fold in finely chopped nuts like pecans or walnuts.
These breadsticks become much more gratifying and flavorful with the addition of almonds, which create an intriguing textural contrast.
Cauliflower Rice:
Use cauliflower rice instead of breadsticks for a coarser texture.
For people who prefer a chunkier texture with its cheesy delight, this alternative offers a heartier variation.
Sun-Dried Tomatoes:
Add chopped sun-dried tomatoes for a lovely color contrast and a taste explosion.
This ingredient creates a visually stunning dish and adds a Mediterranean flavor that goes well with the garlic.
Vegan Version:
To make it vegan, use a flaxseed meal mixture in place of the egg.
This ensures that everyone can enjoy the flavor while maintaining the breadsticks’ integrity and satisfaction!
Cheesy Keto Cauliflower Garlic Breadsticks: What to Serve Them with?
These filling, delicious treats will elevate your supper and go well with a variety of items on your table.
- Low-Carb Pasta Primavera: A variety of fresh bell peppers and zucchini will bring out the cheesy flavors while maintaining the meal’s lightness.
- Creamy Tomato Soup: The breadsticks’ richness and the soup’s acidity combine to create the perfect comfort meal combination.
- Italian salad: The cheesy, rich breadsticks are counterbalanced with crisp greens, tart olives, and feta cheese.
- Grilled Chicken: The aromas of cheddar and garlic complement the protein-rich, herb-marinated chicken.
- Marinara Dipping Sauce: The garlic flavor is enhanced by a flavorful dipping sauce, which makes every bite burst with flavor.
- Garlic Butter Shrimp: The breadsticks and the richness of the shrimp in garlic butter go together like clockwork.
- Red Wine: The flavorful garlic and cheese pair wonderfully with a glass of robust red wine, complementing every bite.
- Roasted Vegetables: Seasonal roasted vegetables enhance the flavors and textures of your meal, adding color and nutrition.
- Caesar Salad: Perfect for a well-balanced dinner with the breadsticks, the crunchy romaine and creamy dressing provide a delicious contrast.
- Dessert Option: Finish with a light berry parfait; the sweet, delicious finish of fresh fruit completes your meal.
How to Keep Cheesy Keto Cauliflower Garlic Breadsticks Fresh and Freeze Them
Refrigerator: Keep any leftover breadsticks for up to two days in an airtight container. Do not stack them immediately on top of one another to preserve their cheesy richness.
Freezer: For extended storage, place the breadsticks in a freezer bag for up to three months after freezing them in a single layer on a baking sheet until they solidify.
Reheating: Warm through and crisp again in a toaster oven or conventional oven set to 350°F (175°C). This keeps the delicious texture of your cheesy Keto Cauliflower Garlic Breadsticks intact.
Avoid sogginess: To maintain the crunchiness of the breadsticks, make sure there isn’t any extra moisture present when storing or reheating.
Make Decisions in Advance
Busy home cooks who want to cut down on time during the week will love these Cheesy Keto Cauliflower Garlic Breadsticks! By following the first steps, you may prepare the cauliflower mixture up to 24 hours ahead of time: steam or microwave the cauliflower, drain thoroughly, and then add the cheese and seasonings.
To preserve freshness, keep the mixture refrigerated in an airtight container.
Just form it into sticks and follow the baking directions when you’re ready to bake.
Enjoy the convenience of having nearly everything prepared in advance, and know that they will still taste cheesy and great when served!
Preparing Cheesy Keto Cauliflower Garlic Breadsticks in 7 minutes
FAQs for the recipe for Cheesy Keto Cauliflower Garlic Breadsticks
Why is using dry cauliflower important?
Of course! To get the ideal texture for your breadsticks, make sure your cauliflower is extremely dry after cooking. Sogginess caused by moisture can cause your breadsticks to lose their desired flavor. Drain well after steaming or microwaving, and you might even want to use a clean kitchen towel or cheesecloth to squeeze out any remaining water.
How should leftover garlic breadsticks be stored?
Really! Store any leftover Cheesy Keto Cauliflower Garlic Breadsticks in the refrigerator in an airtight container for up to two days. To keep them from becoming soggy, be careful not to stack them exactly on top of one another. Simply place them in a toaster oven or conventional oven set to 350°F (175°C) until they are reheated and crispy.
Are these breadsticks freezer-friendly?
Indeed, you can! Put your Cheesy Keto Cauliflower Garlic Breadsticks in a single layer on a baking sheet and freeze until they solidify. After they get solid, store them for up to three months in an airtight container or freezer bag. For a tasty, easy snack, simply reheat them in the oven at 350°F (175°C) when you’re ready to eat them!
If my breadsticks come out mushy, what should I do?
Oh no! If your breadsticks come out wet, it’s probably because the cauliflower is overly moist. Next time, be sure to drain the cooked cauliflower completely. To make sure they get the ideal firmness without burning, you may also try baking them a little longer or reducing the oven temperature. Finally, look for visual cues: your breadsticks should be firm to the touch and golden brown.
Are those who are allergic to gluten able to eat these breadsticks?
Of course! Being gluten-free, these Cheesy Keto Cauliflower Garlic Breadsticks are a great choice for anyone on a gluten-free diet. Just make sure your cheese and other items are gluten-free by checking their labels, especially if you’re making substitutes.
If I don’t have Italian seasoning, what can I use?
More is always better! You may easily mix your own blend if you don’t have Italian seasoning on hand. For a tasty alternative that will give your breadsticks that cozy Italian taste, mix equal portions dried oregano, basil, and thyme! The essence of traditional Italian cooking may be found in your home with this easy mixture.
Conclusion
Cheesy Keto Cauliflower Garlic Breadsticks prove that eating healthy doesn’t mean giving up on flavor. With their crispy edges, gooey cheese, and rich garlic aroma, these low-carb breadsticks are the perfect solution for quick snacks, family dinners, or guilt-free comfort food cravings. Ready in just 7 minutes, they fit effortlessly into busy lifestyles while still delivering restaurant-quality taste at home.
Whether you enjoy them with marinara, pair them with your favorite meals, or customize them with your own creative twists, this recipe is sure to become a regular favorite in your kitchen. Try it once, and you’ll see why these keto-friendly breadsticks are so addictive and loved by everyone.
So grab your ingredients, preheat your oven, and treat yourself to this cheesy, wholesome delight today. Don’t forget to share this recipe with friends and family—and let them experience the magic too!