
- Quick & Easy Tomato Cucumber Salad with Feta
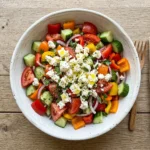
This Tomato Cucumber Feta Salad Recipe will become your go-to summertime favourite if you’re in the mood for something light, colourful, and tasty.
The creamy tang of feta cheese and a straightforward olive oil dressing skilfully blend the crisp crunch of bell peppers and cucumber with the luscious sweetness of ripe tomatoes.
It’s a simple salad full of texture and freshness that can be eaten on its own as a light, healthful treat or added to any meal.
Ingredients You’ll Need
Despite being really basic, each of these components is crucial to achieving the ideal harmony of tastes and textures in this salad.
Every component of this dish, from the salty feta to the fresh vegetables, adds to its deliciousness and satisfaction.
- 5 Tomatoes: For a naturally tart and sweet base, pick ripe, juicy tomatoes.
- 1 English cucumber: Provides a cool crisp without dominating other flavours.
- 1/2 Red bell pepper: Provides a bright colour and a crunchy texture.
- 1/2 Orange bell pepper: Adds a striking colour and a hint of sweetness.
- 1/2 Yellow bell pepper: Adds a subtle citrussy note and visually brightens the salad.
- 1/2 Red onion: Gives the creamy cheese a lovely contrast with its biting bite.
- 1 tsp Salt: Balances the acidity and brings out all the natural flavours.
- 2 tbsp Olive oil: Its rich, fruity flavour is the magic ingredient that unifies everything.
- 1/2 cup Feta cheese: Crumbled feta cheese gives the entire salad a creamy, salty boost.
Recipe for Tomato Cucumber Feta Salad
step 1: get your vegetables ready.
First, give all of your fresh produce a good wash. Next, cut into small pieces the tomatoes, English cucumber, red bell pepper, orange bell pepper, yellow bell pepper, and red onion.
This salad is both aesthetically pleasing and simple to consume because of its consistent size, which allows each mouthful to capture all the colours and flavours at once.
Step 2: Gently Mix the Ingredients
Fill a large mixing bowl with all of the chopped vegetables. After adding the olive oil and salt, gently toss everything together until the vegetables are coated but not crushed. In addition to keeping the texture crisp, this meticulous mixing keeps the tomatoes from leaking too much juice, which might make the salad sloppy.step 3: Add the feta cheese in step three.
Lastly, crumble the feta cheese over the mixed vegetables. Gently fold it in only to mix, rather than forcefully swirling it in. In this manner, you’ll be able to keep delicious bits of creamy feta that are bursting with flavour with each bite. To allow the flavours to blend harmoniously, refrigerate the salad for ten to fifteen minutes before serving.Recipe for Tomato Cucumber Feta Salad and How to Serve It
Add-ons
Add some chopped parsley, mint, or dill to your Tomato Cucumber Feta Salad Recipe to make it seem even more enticing. A squeeze of lemon juice or a pinch of cracked black pepper can further enhance the flavours and provide a lovely finishing touch.Side dishes
This salad goes well with pita bread or falafel, as well as grilled meats like chicken or lamb. It also works well as a cool contrast to hearty main courses like roasted vegetables or creamy pasta, making the entire meal more enjoyable.Innovative Methods for Presenting
Serve this salad stacked in a clear glass dish to highlight the colours for a playful twist. It can be served individually in little jars or over a bed of mixed greens, making it an attractive appetiser for entertaining guests or ideal for picnics.Preparation and Storage
How to Store Remaining Food
Any leftovers can be stored in the fridge for up to two days in an airtight container. In order to preserve its crunchy texture and fresh flavour, the salad is best consumed fresh rather than kept in storage for an extended period of time because it contains fresh veggies and feta.Freezing
Because the fresh cucumbers and tomatoes will become watery and lose their crisp texture when thawed, this Tomato Cucumber Feta Salad Recipe should not be frozen. To experience its bright, crisp features, it is best made fresh.Warming up
Reheating is not advised because this salad is meant to be served cold. For optimal results, serve leftovers cold from the refrigerator or allow them come to room temperature.FAQs
Is it possible to use other cheeses for feta?
Of course! Although the characteristic acidic creaminess of feta is present, you could choose fresh mozzarella for a softer texture or goat cheese for a milder flavour. Just remember that the salad is distinctively complemented by the saltiness of the feta.Does this salad have a dressing?
The natural flavours of the salad are highlighted by the mild dressing of olive oil and salt. If desired, a dash of lemon juice or red wine vinegar can provide a pleasant acidic kick without dominating the freshness.Is it possible to incorporate herbs into the recipe for tomato cucumber feta salad?
Without a doubt! Mint, dill, parsley, and basil are examples of fresh herbs that bring amazing flavour and scent bursts to your salad, making it even more unique and colourful.When prepared, how long does this salad stay fresh?
Enjoy it within a few hours to up to two days in the refrigerator for optimal flavour and texture. During this period, the flavours are at their peak and the vegetables remain crisp.Does this salad fit into any particular diet?
Indeed! It is naturally vegetarian-friendly and free of gluten. It’s ideal for a light, healthful option at any time, and you can adjust the salt if you’re managing your sodium consumption.Final thoughts
A straightforward recipe for tomato cucumber feta salad that is quick to prepare and tastes incredibly fresh and filling has a genuinely joyous quality. I urge you to try this dish; it’s a lovely way to honour fresh vegetables and ideal for sharing on a bright day with loved ones. Once you give it a try, you could discover that, like me, it becomes a regular part of your meal routine! - Peptides For Weight Loss: Fat Loss, Benefits and Risks Associated with it

Weight loss is the most searched health goal nowadays because everyone wants a healthy body. With increasing awareness about metabolism hormones and medical weight loss treatments peptides for weight loss is a trending topic in the health and fitness world.
Peptides are small chains of amino acids that act in the body as molecules. They help in regulating many biological functions including metabolism appetite , fat burning and muscle growth.
Researchers and medical still discovering peptides for fat loss and muscle gain as potential tools for weight management because of its effectiveness.
Here we will explore the best appetite for weight loss, how they work, possible appetite for weight loss side effects and what people say about peptides for weight loss reviews.
What is a peptides for weight loss?
A peptide for weight loss is a short chain of amino acids that is designed to influence hormones and metabolic processes which affect body weight.
These appetites work by stimulating natural hormones that are responsible for fat metabolism, appetite control and energy balance.
Few peptides are made to mimic hormones such as GLP 1 which allow regulation of sugar and reduce hunger. Others stimulate growth hormones that support fat burning and muscular maintenance.
Due to these benefits, many health experts believe that peptides for fat loss and muscle gain plays an important role in modern weight management treatments.
How peptides help with fat loss
Peptides can influence several biological pathways to help body in losing fat effectively.
- Appetite suppression
- Fast metabolism
- Fat reduction
- Muscle prevention
Appetite Suppression
Certain peptides can reduce hunger signals in the brain, which makes it easier for calories not to get in fastly.
Fast Metabolism
Some peptides boost metabolic activity which allowing body to burn calories at high rate.
Fat Reduction
Peptides can increase activation process in the body which encourage body to break down fat that is stored.
Muscle Prevention
One of the major benefits about peptides is that it helps in reducing fat and gaining muscle weight. This helps in preserving lean muscle mass during weight loss.
The combination of peptides is best for those individuals who are seeking fat loss.
Best injectable peptides for weight loss
Weight loss peptides are administrated through injections that ensure the blood flows efficiently. The best injectable peptides for weight loss works on appetite hormones and metabolism.
The most common injectable peptides are:
- GLP 1 Receptor Peptides
- Growth Hormones Releasing Peptides
- Metabolism Regulating Peptides
Among these three options, GLP 1 peptides for weight loss is the most widely studied thing for weight loss treatment.
Peptides for weight loss and muscle gain
One of the most interesting benefits about peptides is its ability to support both fat burning and muscle growth.
Traditional weight loss methods that leads to muscle loss along with fat loss are peptides that help preserving lean muscle mass.
It makes peptides for fat loss and muscle gain specifically famous among athletes and fitness enthusiastic who wants to improve body composition rather than simple weight loss.
With combined resistance training and proper nutrition, these peptides can help create a leaner body and strong physique.
Peptides for weight loss side effects
Peptide offers promising benefits, like the understanding of potential peptides for weight loss side effects. The possible side effects may include:
- Nausea or digestive discomfort
- Headache
- Fatigue
- Injection site irritation
- Changes in blood sugar levels
- Not everyone experiences these effects, but individuals should consult healthcare professionals before using this therapy.
Peptides for weight loss reviews
Online peptides for weight loss reviews highlight a range of experiences
Users report these benefits which are as follows:- Reduced appetite
- Gradual fat loss
- Increased energy levels
- Metabolism control
However, some reviews do mention the side effects or slow results when peptides are used without basic diet or exercise.
It highlights an important fact : peptides are not magic solutions. They work best when combined with healthy lifestyle habits.
Best peptides for female fat loss over the counter
Many women search for the best peptides to counter weight loss among females. They can reduce weight loss solutions which are accessible without complicated treatments.
Over the counter peptides supplements aim to support metabolism, energy production and fat burning systems. These products contain amino acids which blend to mimic certain peptide functions.
It is important to verify product quality and safety before using any supplement. Consulting healthy professionals is always recommended.
How to make peptides for weight loss
Some people search for ways to make peptides for weight loss. It is crucial to understand that peptides are complex molecules that produce specialized scientific processes.
Peptides are created using advanced laboratory synthesis techniques. These processes ensure purity, stability and dosage.
Peptides should only be obtained from reputable medical or pharmaceutical sources rather than creating them independently.
Tips to maximize weight loss with peptides
For best results from peptides based weight loss programs you need recommendations from experts about healthy lifestyle tips.
Key strategies include:
- Maintaining balanced and nutrition diet
- Engaging in regular physical activities
- Getting enough sleep
- Staying hydrated
- Reduced stress levels
These habits can significantly enhance the practice of losing weight and muscle gain.
The rising popularity of peptides for weight loss reflects the interest of scientific based approaches to lose fat and increase metabolism health.
However, like any healthy treatment peptides should be used responsibly. Understanding peptides for weight loss side effects, consulting medical professionals and maintaining healthy habits are important for achieving effective results.
FAQs
What is the best peptide for weight loss?
The best peptide for weight loss depends on individuals health goals, many experts highlight GLP 1 peptides for weight loss due to their appetite benefits
Are peptides safe for weight loss?
Many peptides are considered safe to use. As there are peptides for weight loss side effects depending on type and dosage.
Do peptides help with fat loss and muscle gain?
With certain peptides that support fat metabolism while preserving lean muscle is the type which greatly helps in fat loss and gaining muscles.
Are these peptides available over the counter ?
Few supplements are marketed as peptides without prescription but medical peptides should only be used under professional guidance.
Do peptides work without diet and exercise?
Peptides can support weight loss, but the results come when they are combined with healthy nutrition, physical activities and lifestyle habits.
{ “@context”: “https://schema.org”, “@type”: “FAQPage”, “mainEntity”: [{ “@type”: “Question”, “name”: “What is the best peptide for weight loss?”, “acceptedAnswer”: { “@type”: “Answer”, “text”: “The best peptide for weight loss depends on individuals health goals, many experts highlight GLP 1 peptides for weight loss due to their appetite benefits” } },{ “@type”: “Question”, “name”: “Are peptides safe for weight loss?”, “acceptedAnswer”: { “@type”: “Answer”, “text”: “Many peptides are considered safe to use. As there are peptides for weight loss side effects depending on type and dosage.” } },{ “@type”: “Question”, “name”: “Do peptides help with fat loss and muscle gain?”, “acceptedAnswer”: { “@type”: “Answer”, “text”: “With certain peptides that support fat metabolism while preserving lean muscle is the type which greatly helps in fat loss and gaining muscles.” } },{ “@type”: “Question”, “name”: “Are these peptides available over the counter ?”, “acceptedAnswer”: { “@type”: “Answer”, “text”: “Few supplements are marketed as peptides without prescription but medical peptides should only be used under professional guidance.” } },{ “@type”: “Question”, “name”: “Do peptides work without diet and exercise?”, “acceptedAnswer”: { “@type”: “Answer”, “text”: “Peptides can support weight loss, but the results come when they are combined with healthy nutrition, physical activities and lifestyle habits.” } }] }
- Reese’s Campfire Cones Recipe

Introduction
Nothing truly encapsulates the fun and nostalgia of camping like a sweet, melty treat made right over the fire, which is exactly what the Reese’s Campfire Cones Recipe provides for your outdoor experiences. This delectable dessert blends the crispness of waffle cones with the gooey, chocolatey enchantment of micro marshmallows, Reese’s micro Peanut Butter Cups, chocolate chips, and Reese’s Pieces to create an easy-to-make indulgence ideal for outdoor events. Whether you roast these cones by the campfire or bake them in your home oven, you’re in for a nostalgic and delicious experience that will undoubtedly become a favorite tradition.
Ingredients You Will Need
The Reese’s Campfire Cones Recipe’s enchantment comes from its basic, carefully chosen ingredients. Each piece contributes significantly to the texture and flavor symphony, from the crispiness of the waffle cone to the creamy peanut butter chocolate treasure inside.
Waffle cones: These serve as the ideal culinary container, providing crunch and structure to house all of the delectable ingredients.
Mini marshmallows: The fluffy texture melts down well, resulting in an irresistibly gooey, sweet coating.Chocolate chips: Add bursts of smooth, melted chocolate that wonderfully complement the peanut butter.
Reese’s Mini Peanut Butter Cups are the star ingredient, with creamy peanut butter encased in milk chocolate for a trademark flavor.
Reese’s Pieces: Tiny bursts of crunch and color that brighten up every meal with peanut butter flavor.How to Prepare Reese’s Campfire Cones Recipe
Step 1: Begin with a marshmallow base
Start by filling the bottom quarter to one-third of the waffle cone with tiny marshmallows. This base layer keeps every bite gooey and sweet while also acting as a cushion for the layers above, preventing your cone from collapsing.
Step 2: Layer the Chocolate and Peanut Butter Goodies
Next, gently layer chocolate chips, then sprinkle with Reese’s Mini Peanut Butter Cups, followed by Reese’s Pieces. Add another handful of mini marshmallows on top, gently pressing each layer down just enough to keep everything inside the cone without squishing out. This layering technique achieves the ideal blend of creamy, crunchy, and melty textures.
Step 3: Wrap it tightly in aluminum foil
Wrap each filled cone tightly in aluminum foil to avoid melting incidents. Cover the top of the cone first to prevent the ingredients from pouring out, then fold the bottom and sides nicely. This wrapping technique will safeguard your wonderful creation when baking or over an open flame.
Step 4: Select your cooking method
If you’re indoors or prefer to use the oven, preheat it to 350°F. Place the foil-wrapped cones on a baking sheet and bake for 10 to 15 minutes, until the chocolate and marshmallows are completely melted and gooey.
Step 5: Cook over a fire or grill
To create an authentic campfire atmosphere, set your wrapped cones directly on hot embers or grill grates. Turn them every few minutes for 5 to 7 minutes. This gives the cone a delicate toasted flavor, while the interior melts evenly, resulting in a warm, lovely dessert.
Step 6: Cool and enjoy
Once cooked, carefully take the cones from the flame and allow to cool for a minute or two – they will be hot! Then, gently unfold the foil and indulge in the creamy, melty wonder of your Reese’s Campfire Cones Recipe.
How to Serve Reese’s Campfire Cones Recipe with Garnishes
If you wish to add some flair, after unwrapped, sprinkle crushed peanuts or a splash of sea salt on top. This provides a wonderful crisp contrast and brings out the peanut butter flavor beautifully. A drizzle of caramel or a sprinkle of powdered sugar can enhance the experience even further.
Side Dishes
These cones are delicious on their own as a dessert, but mixing them with fresh fruit like strawberries or bananas provides a refreshing contrast to the richness. For a complete camping feast, serve with s’mores or a cup of creamy hot chocolate to maintain the comfortable atmosphere.
Creative ways to present
Serve the cones upright in a small flower pot filled with dry rice or beans to keep them stable. For a creative variation, make cones with different Reese’s candies or mix in nuts to adjust the sweetness and crunch to your preference. Presenting these in colorful foil gives a festive touch to outdoor celebrations and family gatherings.
Make Ahead and Storage
Storing leftovers
If you have any cones left over (though it’s difficult to imagine!), keep them wrapped firmly in foil or in an airtight container at room temperature for up to a day. Keep in mind that the texture is best savored fresh, since the waffle cones tend to soften with time.
Freezing
Wrap the cones tightly and freeze them before cooking to extend their shelf life. When you’re ready, unwrap and cook them straight from the freezer, adding a few minutes to ensure they’re completely melted and ideally warmed.
Reheating
Reheat the covered cones in a 350°F oven for 5 to 7 minutes, or until warm and gooey again. Avoid microwaving because it can leave the cones sloppy and unevenly cooked, and part of the appeal is the crunchy cone outside!
FAQs
Can I use ordinary cones rather than waffle cones?
Waffle cones provide the most crunch and sturdiness for this recipe, although sugar cones would still suffice. To avoid breaking during filling and frying, treat them gently.
Is it feasible to make these cones Vegan?
Absolutely! Use vegan waffle cones, dairy-free chocolate chips, and vegan marshmallows, as well as vegan peanut butter cups and candy-coated chocolates. The results are equally delightful and inclusive.
Can I prepare these cones ahead of time for my camping trip?
Yes! At home, assemble and wrap them firmly in foil before storing in a fridge or freezing until ready to cook over the campfire, making your camping dessert simple and mess-free.
What is the best approach to ensure that marshmallows melt evenly?
Layering small marshmallows at the bottom and throughout the cone promotes even melting. Cooking time and a careful turn over the fire or grill ensure gooey deliciousness without burning.
Can I modify the fillings?
Definitely! While the basic Reese’s Campfire Cones Recipe is popular, you may customize it by adding nuts, various candies, or even a swirl of peanut butter within. The options are limitless and enjoyable to experiment with!
Final Thoughts
If you’re looking for a quick, fun, and delicious treat that will bring everyone together, I highly recommend trying the Reese’s Campfire Cones Recipe. It’s the ideal combination of nostalgic flavors and simple preparation that transforms every gathering into a pleasant, laughter-filled celebration. Once you’ve tried them, I’m sure these gooey chocolate-peanut butter treats will become a regular at your next outdoor trip or warm kitchen night.
- Red Lobster Shrimp Scampi Recipe

Introduction
If you’ve ever wanted to recreate a restaurant favorite in your own home, this Red Lobster Shrimp Scampi Recipe will be your new best friend. Imagine luscious, perfectly cooked shrimp in a vibrant garlic, white wine, and lemon sauce mixed with that trademark Old Bay seasoning punch that gives a magnificent explosion of flavor with each bite. It’s quick enough for a weeknight supper but impressive enough to serve to guests, perfectly balancing simplicity and indulgence. Once you’ve tried it, you’ll understand why it’s a classic crowd-pleaser and a recipe to keep handy.
Ingredients You Will Need
What’s particularly great about this dish is how little ingredients are required, but each one is essential to generating the deep tastes and delicious textures. Every component of the Red Lobster Shrimp Scampi Recipe, from the plump shrimp to the fragrant garlic and buttery sauce, contributes to its success.
1 pound exceptionally large shrimp, peeled and deveined: The highlight of the dish, with juicy and tender seafood flavor.
½ teaspoon Kosher salt enhances the shrimp’s natural flavor without dominating it.Season with ¼ teaspoon freshly ground black pepper for a subtle spice and depth.
2 tablespoons Old Bay Seasoning, divided: The finishing touch that gives the meal its signature Red Lobster-inspired flavor.
1 tablespoon olive oil: For searing the shrimp to a golden finish.
Four minced garlic cloves add aromatic freshness and flavorful depth to the sauce.
1 1/2 cups white wine: Boosts acidity and complexity, making the sauce bright and delicious.
1 lemon, juiced: Adds vivid citrus overtones to counter the richness of butter.
1/2 cup unsalted butter at room temperature: Makes a velvety, creamy sauce that caresses each shrimp perfectly.
1 tablespoon fresh parsley leaves, cut for serving: Adds a splash of color and herbal brightness.
Grated Parmesan for serving: Provides a subtle savory touch and an added pleasure.How to Prepare Red Lobster Shrimp Scampi
Step 1: Prepare and season the shrimp
Begin by sprinkling both sides of the shrimp with kosher salt, fresh ground black pepper, and half of the Old Bay seasoning. This step is critical because it introduces robust flavors from the start, guaranteeing that every bite is bursting with that trademark flavor.
Step 2: Sear the shrimp
Heat the olive oil in a large skillet over medium-high heat until it shimmers. Cook the shrimp for 2 to 3 minutes on each side, until they are opaque and slightly browned. Be careful not to overcook the shrimp; nicely seared shrimp are delicate and juicy. Once finished, place them on a plate to rest while you prepare the sauce.
Step 3: Infuse the sauce with garlic
In the same skillet, cook the minced garlic for about a minute. This fast phase allows the garlic to release its aromatic oils without burning, creating the delectable base for your sauce.
Step 4: Deglaze using white wine and lemon juice
Pour in the white wine and freshly squeezed lemon juice to deglaze the pan, scraping up any lovely browned pieces that have stuck to the skillet. These chunks have a great flavor, and mixing them with wine and lemon adds brightness and acidity that properly balances the butter.
Step 5: Simmer to concentrate flavor
Bring the mixture to a boil, then reduce the heat and simmer for 5 minutes. This gentle simmer significantly reduces the sauce, concentrating the flavors and toning down the harshness of the wine and lemon.
Step 6: Season the Sauce with Butter and Seasoning
Stir in the butter and the remaining Old Bay seasoning until completely melted and mixed into the sauce. This step turns your sauce into a very creamy and tasty covering for shrimp.
Step 7: Return the shrimp to the pan
Return the cooked shrimp to the skillet and toss to coat evenly with sauce. Season to taste with salt and pepper, then top with freshly chopped parsley for a burst of herbal color and freshness.
Step 8: Garnish and serve
Just before serving, sprinkle grated Parmesan on top for a delicate nutty touch that complements the garlic butter sauce and shrimp nicely. Serve immediately for the greatest texture and flavor.
Serve Red Lobster Shrimp Scampi with Garnishes
Fresh parsley and grated Parmesan are standard garnishes that enhance the dish’s visual and culinary appeal. The parsley lends a fresh, somewhat peppery touch, while the Parmesan offers a creamy, umami flavor that perfectly levels out the butter sauce.
Side Dishes
This shrimp scampi shines atop a bed of al dente linguine or angel hair pasta, soaking up every drop of the delicious sauce. For those looking for a lighter option, pair it with steamed vegetables or a crisp green salad to balance richness with a refreshing crunch.
Creative ways to present
For an eye-catching display, serve this Red Lobster Shrimp Scampi Recipe in separate shallow bowls, spreading additional sauce over each one. Garnish with lemon wedges for zing and a few sprigs of parsley. For a particular touch, serve it over creamy risotto or garlic mashed potatoes.
Make Ahead and Storage
Storing leftovers
Leftover shrimp scampi should be chilled to room temperature before storing in an airtight container in the refrigerator. To preserve the greatest texture and flavor, eat within two days.
Freezing
While the shrimp can be frozen separately, the cooked shrimp and sauce have a delicate texture that does not always store well. If freezing is necessary, freeze only the sauce part in a tight container and reheat with newly cooked shrimp.
Reheating
Reheat the scampi gently on the stove over low heat, adding water or white wine to loosen the sauce as needed. If possible, avoid microwaving shrimp since they can become rubbery. Slow warming retains the buttery sauce and delicate shrimp perfectly.
FAQs
Can I substitute frozen shrimp for this recipe?
Absolutely! Simply defrost the shrimp fully and pat them dry before seasoning and cooking for the greatest sear and texture in the Red Lobster Shrimp Scampi Recipe.
What kind of white wine works best for the sauce?
A dry white wine like Sauvignon Blanc, Pinot Grigio, or Chardonnay pairs well, adding acidity and mild fruitiness without dominating the other components.
Can this dish be made without butter?
The butter is essential for making the creamy, luscious sauce that distinguishes scampi, but you can substitute olive oil if necessary, but the flavor and richness may be less evident.
How hot is the Old Bay seasoning in this dish?
Old Bay’s herbs and spices provide a mild to moderate heat, increasing taste without making the food too hot. It pairs nicely with lemon and garlic here.
Is this dish good for meal prep?
Yes! The shrimp and sauce may be made ahead of time and refrigerated separately, allowing for a simple reheat for a tasty, hassle-free supper on hectic days.
Final Thoughts
This Red Lobster Shrimp Scampi Recipe is a tremendous hit for anyone looking to recreate restaurant-style seafood enchantment in their own home. It’s effortless, flavorful, and exudes both comfort and elegance. Whether you’re cooking for family, friends, or just treating yourself, try this recipe and see how easy it is to produce outstanding dishes that everyone will eagerly return for seconds.
- Sheet Pan Asparagus Mushroom Gnocchi Recipe

Introduction
This Sheet Pan Asparagus Mushroom Gnocchi Recipe is perfect if you’re looking for a straightforward but gorgeous weekday supper. This dish is a beautiful combination of flavors and textures, combining crisp-tender asparagus, earthy mushrooms, and tender pillowy gnocchi that have all been perfectly roasted and enlivened with fresh lemon and garlic. What makes it truly exceptional is how seamlessly everything comes together on one sheet pan, making cooking and cleanup a snap while providing a meal that feels both comfortable and elegant.
Required Ingredients
It’s easy to find the correct ingredients for this dish. Together, they provide a well-balanced dish with layers of taste and amazing texture. Each is simple yet incredibly important.
- One pound of gnocchi: Whether fresh or shelf-stable, these tender dumplings are the focal point of the dish, absorbing all the delectable flavors as they roast.
- 8 ounces sliced white mushrooms: These meaty, earthy mushrooms provide depth and a delightful taste.
- Three garlic cloves (roasted in their skins): Adds subtle sweetness and fragrance while mellowing the garlic flavor.
- Three tablespoons olive oil: A high-quality olive oil adds depth and facilitates a perfect roast.
- One teaspoon kosher salt: Enhances every flavor in the dish.
- 1/2 teaspoon black pepper: Adds a gentle hint of spice.
- One lemon (cut in half): Adds bright citrus flavor when roasted.
- 1/2 pound asparagus (trimmed and sliced into 1-inch pieces): Provides color contrast and crisp texture.
- Chopped parsley: Adds freshness and vibrant color.
- Shaved Parmesan: Provides a nutty, salty finish when serving.
Recipe for Sheet Pan Asparagus Mushroom Gnocchi
Step 1: Get the Ingredients and Oven Ready
Start by preheating your oven to 450°F. This high temperature is essential for roasting the vegetables and gnocchi to golden, crispy perfection. Meanwhile, prepare the asparagus, garlic, mushrooms, and gnocchi as instructed.
Step 2: Roast and Toss the Initial Round
Combine the gnocchi, sliced mushrooms, and garlic cloves (with skins on) on a large sheet pan along with two tablespoons olive oil, kosher salt, and black pepper. Spread everything in a single layer to ensure even roasting. Place the lemon halves cut-side down on the pan.
Roast for 15 minutes, allowing the gnocchi to start crisping and the mushrooms to release their juices.
Step 3: Continue Roasting After Adding the Asparagus
After the first 15 minutes, spread the trimmed asparagus pieces over the pan. Return the sheet pan to the oven and roast for another 8–10 minutes.
By this point the asparagus will be bright and tender, the gnocchi soft and cooked through, and the mushrooms beautifully caramelized.
Step 4: Prepare the Lemon Dressing with Roasted Garlic
Carefully remove the softened garlic cloves from their skins and place them in a large mixing bowl. Press the roasted lemon halves with tongs to release their juice and add it to the bowl.
Whisk in the remaining tablespoon of olive oil and mash everything with a fork to create a rich, aromatic lemon-garlic dressing.
Step 5: Mix and Garnish with Parmesan and Fresh Herbs
Add the roasted gnocchi, mushrooms, and asparagus to the bowl with the dressing. Gently toss everything to coat the vegetables and gnocchi in the flavorful garlic-lemon sauce.
Just before serving, sprinkle with shaved Parmesan cheese and chopped parsley for a fresh, savory finish.
Recipe Garnishes for Sheet Pan Asparagus Mushroom Gnocchi
Fresh garnishes add a final layer of flavor and visual appeal. A sprinkle of chopped parsley adds a vibrant green color and fresh herbal aroma that complements the lemon and garlic. Shaved Parmesan provides a rich salty flavor that makes every bite more delicious.
Side Dishes
This dish works perfectly as a comforting meal on its own, but it also pairs beautifully with:
- crusty garlic bread
- a crisp green salad with vinaigrette
- grilled fish
- roasted chicken
These additions make the meal more filling and balanced.
Innovative Methods for Presenting
Serve this gnocchi family-style directly from the baking sheet for a casual dinner setting.
Alternatively, plate individual servings with a drizzle of olive oil, extra Parmesan shavings, and freshly cracked pepper. This presentation works wonderfully for dinner parties while keeping the dish simple and elegant.
Preparation and Storage
How to Store Remaining Food
Store leftovers in an airtight container in the refrigerator for up to three days. The flavors often deepen overnight, making the next day’s meal even more delicious.
Freezing
Gnocchi freezes fairly well, but roasted asparagus may lose texture after thawing. For best results, freeze the gnocchi mixture separately from the asparagus and consume within one month.
Warming Up
Reheat leftovers gently in a skillet over medium heat to keep the gnocchi crisp. Avoid microwaving when possible, as it may soften the gnocchi and wilt the vegetables.
FAQs
Can I make this recipe with frozen gnocchi?
Yes. Frozen gnocchi works just as well. Add them directly to the sheet pan without thawing to keep their texture crisp on the outside and soft inside.
What can I use instead of asparagus?
Green beans, broccoli florets, or snap peas make excellent substitutes while still providing color and crunch.
Is this recipe vegan?
Yes. Simply omit the Parmesan or replace it with a vegan cheese or nutritional yeast.
Can I add protein to this meal?
Absolutely. Grilled chicken, sautéed shrimp, or crispy tofu are great options for adding extra protein.
How do I make the gnocchi crispy?
Use a high oven temperature (450°F), spread the gnocchi in a single layer, and coat them with enough olive oil before roasting.
Final Thoughts
I hope this Sheet Pan Asparagus Mushroom Gnocchi Recipe inspires you to bring warmth and comfort into your kitchen. It’s one of those meals that feels special while requiring very little effort. Once you try it, it may quickly become a favorite dish for family dinners and gatherings alike.
- Easy Greek Bean Salad with Marinated Beans Recipe
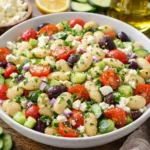
Introduction
There’s something wonderfully seductive about a salad that’s packed with fresh flavors and pleasant textures, especially when it comes together quickly. The Easy Greek Bean Salad with Marinated Beans Recipe is a colorful combination of tender butter beans marinated in a zesty lemon and oregano vinaigrette, served with crisp cucumber, juicy cherry tomatoes, salty olives, and creamy feta cheese. This salad strikes the ideal blend of acidic, salty, and refreshing, making it a go-to dish for hot days, light lunches, or as a gorgeous side dish at parties. Once you’ve tried this recipe, it’s sure to become a regular in your dinner rotation, with a bright Mediterranean flavor in every bite.
Ingredients You Will Need
The beauty of this Easy Greek Bean Salad with Marinated Beans Recipe is its simplicity and how each item contributes to the final flavor and texture. From the silky olive oil dressing to the crisp vegetables and salty feta, each component is necessary and simple to assemble.
- Extra virgin olive oil (4 tablespoons): The dressing’s rich, delicious basis that pulls everything together seamlessly.
- Lemon juice (3 tablespoons): Adds a refreshing, zesty brightness to the beans and vegetables.
- Lemon zest (1 teaspoon): Enhances the lemon scent and adds a slight citrus pop.
- Mustard (1 tablespoon): Dijon or yellow mustard lends a sharpness to the dressing while also emulsifying it.
- Honey (1 teaspoon): Natural sweetness helps to balance acidity.
- Dried oregano (1½ teaspoons): Provides a distinctive Greek herbal scent and flavor.
- Salt (½ teaspoon): Begin with a light seasoning due to the saltiness of the feta and modify after combining to achieve the desired flavor.
- Black pepper (⅛ teaspoon): Adds mild spiciness to the dressing.
- Butter beans (1 can): These tender, creamy beans soak up the marinade perfectly.
- Cucumber (1 small): Provides crisp and refreshing contrast to the salad.
- Cherry tomatoes (2 cups, halved): Provide luscious sweetness and a bright color.
- Green bell pepper (½, finely diced): Provides a crisp texture and mild, fresh flavor.
- Red onion (½, thinly sliced): Provides a mild onion flavor and attractive color contrast.
- Olives (½ cup, pitted): Briny and rich, they add a classic Greek touch.
- Crumbled feta cheese (¾ cup): Adds a creamy, salty taste to the salad.
How to Make Simple Greek Bean Salad with Marinated Beans Recipe
Step 1: Prepare the Dressing
Begin by combining 4 tablespoons extra virgin olive oil, 3 tablespoons fresh lemon juice, 1 teaspoon lemon zest, 1 tablespoon mustard, 1 teaspoon honey, 1½ teaspoon dried oregano, ½ teaspoon salt, and ⅛ teaspoon black pepper in a small bowl. This vivid dressing is the dish’s core, combining zesty citrus, earthy herbs, and a hint of sweetness. Whisk until smooth and emulsified, creating a beautiful glossy dressing ready to infuse flavor.
Step 2: Marinate the Beans
Drain and thoroughly drain the butter beans before adding them to the dressing bowl. Gently toss each bean in the marinade, allowing them to soak up all of the bright, herbal overtones as you prepare the remaining ingredients. This marinating stage softens the beans’ flavor and brings the salad together beautifully.
Step 3: Prepare the Vegetables and Add to the Salad
Dice the little cucumber, and carefully chop the green bell pepper. Halve the juicy cherry tomatoes and thinly slice half of a red onion. Combine these fresh, crunchy veggies, pitted olives, and crumbled feta cheese in a large mixing dish with the marinated beans. Each addition adds layers of texture and a harmonious blend of tastes that distinguish this simple yet decadent salad.
Step 4: Toss and Serve the Easy Greek Bean Salad with Marinated Beans Recipe
Toss everything gently until the salad is well combined. As you toss, the feta cheese will break down somewhat, spreading its creamy, salty richness throughout the salad. Transfer to a lovely serving dish or platter and serve immediately for a refreshing, tangy bite full of color and taste.
Serve Easy Greek Bean Salad with Marinated Beans
Garnishes
A sprinkling of finely chopped parsley or a few entire oregano leaves on top improves both presentation and flavor. A small spray of extra virgin olive oil before serving can give your Greek bean salad an extra glossy sheen, making it seem even more appealing.
Side Dishes
This salad goes great with grilled meats like chicken souvlaki or lamb kebabs, as well as lighter dishes like roasted vegetables or pita bread with hummus. Because of its vibrant and filling nature, it can also serve as a pleasant main dish on warm days.
Creative Ways to Present
Serve this salad in separate glass jars or bowls for picnics and gatherings, stacking the ingredients for a stunning visual effect. You can also pack it into pita pockets with tzatziki for a quick handheld lunch full of Mediterranean flavor.
Make Ahead and Storage
Storing Leftovers
Keep any leftover salad in an airtight container in the fridge. The flavors will develop overnight as the beans continue to soak in the dressing, making it even more delicious the next day. For the best texture, eat within 2–3 days.
Freezing
The marinated beans and sauce keep nicely separately, but the raw veggies and feta lose their texture when frozen. To freeze, divide the beans and dressing and store in a sealed container or freezer bag for up to two months.
Reheating
This salad is best served chilled or room temperature. If you’ve frozen the beans and dressing, let them thaw in the refrigerator overnight and gently whisk before combining with fresh vegetables for a salad that tastes like it was just made.
FAQs
Can I use different varieties of beans in this recipe?
Absolutely! While butter beans provide a creamy texture, chickpeas or cannellini beans also work well, adding their own flavor and bite to the salad.
What happens if I don’t have fresh lemon zest?
If fresh lemon zest is not available, a tiny amount of high-quality bottled lemon zest or an extra splash of lemon juice will help brighten the dressing, but fresh zest provides the most fragrant lift.
Can I make this salad vegan?
Yes, simply delete the feta cheese or substitute a vegan cheese to maintain the creamy texture and tangy flavor while making the salad completely plant-based.
How long should I marinate the beans?
Even 10–15 minutes of marinating allows the beans to absorb the dressing well, but if you have more time, letting them sit for 30 minutes or longer enhances the taste throughout.
Which types of olives work best?
Kalamata olives are the classic choice for Greek salads, with a rich, briny flavor that complements the other ingredients beautifully, but you may experiment with green olives or other varieties to achieve distinct flavor variations.
Final Thoughts
This recipe for Easy Greek Bean Salad with Marinated Beans is one of those go-to dishes that never disappoints. It’s quick to prepare, bursting with fresh Mediterranean tastes, and adaptable enough to star in a variety of dishes. Whether you’re feeding family, friends, or just yourself, it’s sure to brighten your table and day. Try it—you’ll wonder how you ever survived without this wonderful, nourishing salad!
- Pineapple Cucumber Juice Recipe

Introduction
This Pineapple Cucumber Juice Recipe is ideal for those looking for a hydrating and flavorful drink. This juice, which combines the natural sweetness of fresh pineapple with the cool, crisp fragrance of cucumber and a zesty kick from lemon and ginger, tastes like a tropical vacation in a glass. It’s so simple to make but so tasty that it becomes a go-to for hot days, post-workout refreshment, or whenever you need a naturally reviving boost. After trying this Pineapple Cucumber Juice Recipe, you won’t want to drink anything canned or bland again.
Ingredients You Will Need
Gathering these fresh, clean ingredients is the first step toward preparing a juice that is both delicious and nutritious. Each plays an important part in harmonizing flavor, texture, and color, making this drink both welcoming and colorful.
- Two cucumbers (peeled and sliced into long strips): Provide a cool, watery base that is both pleasant and light.
- 2 cups fresh pineapple pieces: Provide sweetness and tropical vibrancy to the cucumber.
- 1 inch fresh ginger (peeled): Adds a delicate spicy warmth that enhances the flavor profile.
- 1 small lemon (peeled and quartered): Provides a zesty tang that balances sweetness and adds flavor.
How To Make Pineapple Cucumber Juice
Step 1: Prepare the Ingredients
Begin by peeling and chopping the cucumbers into long strips that will fit easily into your juicer chute. Next, peel and slice the fresh ginger into manageable pieces. Peel and quarter the lemon, and ensure that the pineapple is cut into fresh bits. This preparation guarantees seamless juicing with no hiccups.
Step 2: Juice Everything
Feed all of your prepped ingredients—cucumbers, pineapple, ginger, and lemon—through your juicer. Collect the juice in a clean container, and watch as the colors blend wonderfully. The juicer extracts vivid liquid with ease, leaving behind fibrous pulp.
Step 3: Serve or Store
Pour your juice into glasses right away for the most fresh taste. If you don’t drink it right away, keep it in an airtight glass jar in the refrigerator. The juice remains fresh and flavorful for up to 24 hours, allowing you to take an energetic drink whenever you want during the day.
How to Serve Pineapple Cucumber Juice Recipe
Garnishes
Enhance your juice with a sprig of fresh mint or a thin lemon wheel on the rim of the glass. These simple garnishes not only look beautiful, but they also give an aromatic note that makes each drink seem particularly special.
Side Dishes
This drink goes great with light, fresh foods like avocado toast, a crisp green salad, or a handful of mixed almonds. The naturally sweet and tangy juice perfectly compliments mild flavors, making your snack or meal feel balanced and enjoyable.
Creative Ways to Present
For parties or brunches, serve the Pineapple Cucumber Juice Recipe in mason jars or clear tumblers with colorful reusable straws. Adding crushed ice or blending your juice with ice cubes results in a cooled smoothie-like texture that’s ideal for summertime entertaining.
Make Ahead and Storage
Storing Leftovers
Keep any remaining juice in a sealed glass jar in the refrigerator. The airtight seal helps to avoid oxidation and flavor loss. Remember to give it a little swirl before serving again, since settling may occur.
Freezing
You can freeze your juice in ice cube trays for easy single-serving servings. It’s an excellent way to store this juice for later use in smoothies or rapidly chilled drinks. Just defrost the cubes slightly before drinking.
Reheating
This juice shines best when served cold and fresh, thus reheating is not suggested. Instead, serve it chilled or gently thawed after freezing to preserve its vivid flavor and refreshing properties.
FAQs
Can I substitute store-bought pineapple for this juice?
Absolutely! Fresh pineapple is recommended for the finest flavor, but if you must buy it, choose pieces with no added sugars or preservatives to retain the juice fresh and natural.
Do I need a special juicer to make this Pineapple Cucumber Juice Recipe?
A typical centrifugal or masticating juicer should suffice. Just make sure your items are prepared according to the juicer’s instructions for smooth processing.
Is ginger necessary? May I omit it?
The ginger offers a delightful spicy warmth that balances the sweet and fresh aspects, but if you don’t like it, you may reduce or omit it to your preference.
How long does the juice remain fresh?
This juice will remain fresh and tasty in an airtight glass jar in the fridge for up to 24 hours. However, it is best savored while still fresh.
Can I include other ingredients, such as mint or spinach?
Of course. Fresh mint leaves will add freshness, and a handful of spinach will provide nutrition without dominating the vibrant pineapple-cucumber flavor.
Final Thoughts
This Pineapple Cucumber Juice Recipe has rapidly become one of my all-time favorites because of its perfect blend of sweetness, acidity, and brilliant freshness. It’s easy to make and deliciously refreshing, making it the ideal pick-me-up or companion to a healthy lifestyle. I invite you to make a batch, share it with your loved ones, and see how simple it is to drink your way to a happier, more hydrated day.
- Creamy Vegetable Soup Recipe

Introduction
A warm bowl of homemade soup is very comforting, especially when it’s packed with nutritious vegetables and finished with a velvety texture. This Creamy Vegetable Soup Recipe hits the ideal mix between robust and smooth, blending soft carrots, potatoes, broccoli, and sharp cheddar cheese for a rich, savory dish. Whether you’re looking for a filling lunch or a relaxing evening, this soup is like a warm embrace in a bowl, guaranteed to brighten any day with its beautiful colors and delicious flavor.
Ingredients You Will Need
Making this soup is pleasantly simple, requiring only a few fresh and pantry essential items. Every element, from the sweetness of the carrots to the subtle bite of sharp cheddar cheese, adds flavor and texture to this soup, making it a definite crowd-pleaser.
- Butter: Provides a rich, creamy base that improves overall flavor and aids in the proper cooking of the aromatics.
- Diced yellow onion: When cooked and caramelized, it provides a sweet, delicious basis.
- Garlic (minced): Adds warmth and depth to the soup without dominating the other veggies.
- Carrots (peeled and diced): Add natural sweetness and an appealing orange tint.
- Russet potatoes (peeled and chopped): Add creaminess and body, particularly as they break down while cooking.
- Vegetable broth: The foundation that holds all of the flavors together while keeping the soup light and refreshing.
- Broccoli florets (finely diced): Add a subtle crunch and a lovely green contrast to the dish.
- Yellow strong cheddar cheese (freshly grated): Melts into the soup, adding a creamy, cheesy richness that is simply delectable.
- Whole milk: Softens the texture and balances the cheese’s sharpness.
- All-purpose flour: Thickens the soup, giving it a wonderful velvety smoothness.
- Salt (to taste): Essential for blending all of the tastes together harmoniously.
How To Make Creamy Vegetable Soup
Step 1: Melt Butter and Prepare Ingredients
Start by melting the butter in a dutch oven or big saucepan over medium heat. While it’s melting, make sure your vegetables—onion, garlic, carrots, potatoes, and broccoli—are diced and ready to go. This pre-prep step guarantees that your cooking procedure runs smoothly and evenly.
Step 2: Sauté Onions and Garlic
Combine the minced garlic and diced onion with the melted butter. Cook gradually over medium-low heat for 7 to 10 minutes, or until the onion is tender and transparent. This stage creates a fragrant and savory base that will subtly enrich the entire soup.
Step 3: Cook the Carrots
Next, add the diced carrots. Cook for about 5 minutes over medium heat, letting the onion and garlic’s natural sweetness to develop and mingle with the remaining aromatics. This not only adds taste to the soup, but also gives it a gorgeous color.
Step 4: Add the Potatoes and Broth, Then Boil
Now, add the diced russet potatoes and the vegetable broth. Bring everything to a boil, then reduce the heat and simmer until the potatoes are soft enough to be pierced with a fork. This is the part of the soup where everything starts to blend together.
Step 5: Mix Milk and Flour, Then Combine
In a small mixing bowl, combine whole milk and all-purpose flour and stir until smooth. Pour this mixture into the pot and gently whisk to evenly thicken the soup while maintaining it creamy and lump-free.
Step 6: Add Broccoli and Simmer
Add the finely diced broccoli florets and simmer for another 10 to 15 minutes. This moderate simmer softens the broccoli while preserving a slight sharpness and brightness, giving the soup a wonderful texture.
Step 7: Melt the Cheese and Season
Finally, whisk in the freshly grated sharp cheddar cheese until totally melted and the soup thickens even more. The cheese provides a wonderful tartness and lovely creaminess. Season with salt to taste, and if you prefer a thicker consistency, let the soup boil for a little longer.
How to Serve Creamy Vegetable Soup Recipe
Garnishes
A sprinkling of extra sharp cheddar on top makes the soup seem more appetizing while also adding taste. Fresh herbs, such as chopped chives or parsley, add a bright flavor that contrasts wonderfully with the creamy texture.
Side Dishes
This soup goes great with crusty bread or a warm baguette for dipping. A fresh green salad with tangy vinaigrette helps to balance out the soup’s richness, resulting in a pleasant, well-rounded lunch.
Creative Ways to Present
For a fun fall addition, serve the soup in hollowed-out bread bowls or little pumpkin shells. Pour a swirl of cream or a pinch of smoked paprika on top for extra visual appeal and flavor diversity.
Make Ahead and Storage
Storing Leftovers
Once chilled, place your Creamy Vegetable Soup Recipe in an airtight container and refrigerate for up to three days. The flavors develop overnight, making leftovers even more delectable!
Freezing
You may freeze this soup for up to two months. Keep in mind that the broccoli’s texture may soften after freezing, so if you prefer crunchier vegetables, you should eat the soup fresh.
Reheating
Reheat gently on the stove over low heat, stirring constantly to prevent sticking and ensuring equal heat. Adding a splash of milk while reheating might help restore smoothness that has thickened in the fridge or freezer.
FAQs
Can I add other vegetables to this Creamy Vegetable Soup Recipe?
Absolutely! Feel free to substitute or add veggies such as cauliflower, zucchini, or peas to customize the soup to your preferences and what is in season.
Is there a dairy-free alternative to this soup?
To keep this soup creamy and tasty without dairy, substitute olive oil for butter, use plant-based milk instead of whole milk, and replace cheese with a vegan cheese equivalent.
How do I thicken or thin the soup?
To thicken the soup, cook it longer uncovered or add a little more flour combined with milk. Simply add extra vegetable broth or milk to obtain the desired consistency.
Can I make this soup in a slow cooker?
Yes! Sauté the onions and garlic first, then combine all of the ingredients except the cheese and milk in the slow cooker. Cook on low for 6 hours or high for 3 hours, then add the milk and cheese near the end.
What is the best way to reheat soup without it curdling?
Always reheat gradually on low heat, stirring often. To preserve the soup’s texture smooth and creamy, do not boil it after adding milk or cheese.
Final Thoughts
Here’s a little secret: This Creamy Vegetable Soup Recipe is more than simply comfort food; it’s a celebration of basic ingredients working together harmoniously. Whether you’re feeding a family or searching for a comforting supper on a cold night, this soup provides warmth and richness that you’ll want to return to. Don’t be afraid to give it a shot—once you taste it, it might just become your new favorite.
- Superfood Salad with Blueberry Lemon Vinaigrette Recipe

Introduction
This Superfood Salad with Blueberry Lemon Vinaigrette Recipe is a vivid, nutrient-dense lunch that will satisfy your taste senses and energize you throughout the day. Each bite is bursting with fresh greens, juicy berries, creamy avocado, and crunchy almonds, creating the perfect balance of flavors and textures. The acidic, slightly sweet blueberry lemon vinaigrette is the pièce de résistance, seamlessly tying all of the ingredients together and transforming a simple salad into something absolutely amazing and memorable.
Ingredients You Will Need
This meal is simple to prepare because of its simple, nutritious ingredients. Each one is carefully chosen to add not just flavor but also texture and a stunning array of colors, transforming your salad bowl into a feast for the eyes and tongue.
- 6 cups arugula: These peppery and delicate greens provide a robust foundation for the salad.
- 3/4 cup blueberries: These sweet, antioxidant-rich treats provide natural color.
- 3/4 cup raspberries: These bright, tart berries provide a great contrast and freshness.
- 1 avocado (sliced): A creamy texture that complements the sharp greens and berries.
- 1/2 cup chopped red onion: Provides a slight sharpness and pleasant crunch.
- 1/4 cup chia seeds: These tiny powerhouses of fiber and omega-3s provide a nutritional boost.
- 3/4 cup chopped walnuts: These rich, crunchy nuts offer depth and heart-healthy fats.
- 3/4 cup avocado or olive oil (divided): The silky fat that makes the vinaigrette smooth and creamy.
- 1/2 cup blueberries (for dressing): Enhances the vinaigrette’s delicious flavor.
- 1/2 lemon juice: Balances sweetness with sharp acidity.
- 2 tsp lemon zest: Adds an extra burst of zesty citrus scent.
- 3 tablespoons apple cider vinegar: Provides a slight taste that awakens the palette.
- 1 tablespoon dijon mustard: Adds depth and serves as a natural emulsifier.
- 1/2 teaspoon salt: Enhances all flavors and binds them together.
- 1/2 teaspoon ground black pepper: Provides a delicate warmth and depth to the dressing.
How to Prepare Superfood Salad with Blueberry Lemon Vinaigrette Recipe
Step 1: Prepare the Salad Base
Begin by placing the newly rinsed arugula in a large mixing basin. This peppery green makes an excellent basis since it stands up nicely to the acidic vinaigrette and hefty toppings. Next, place the blueberries, raspberries, sliced avocado, and chopped red onion on top. Your salad is already looking beautiful, with all of the vibrant hues merging together.
Step 2: Prepare the Blueberry Lemon Vinaigrette
Now, make the star dressing that makes this Superfood Salad with Blueberry Lemon Vinaigrette Recipe so delicious. In a food processor or high-powered blender, add 1/4 cup avocado or olive oil, 1/2 cup blueberries, half-lemon juice, lemon zest, apple cider vinegar, and Dijon mustard. Blend these for about a minute until smooth. While the motor is running, gradually trickle in the leftover oil. This gentle addition allows the dressing to emulsify correctly, resulting in a delicious, velvety texture that coats each leaf beautifully.
Step 3: Dress and Toss the Salad
Pour the dressing over the salad you’ve assembled. Depending on your preferences, you may not need all of the vinaigrette, leaving you with leftovers to refrigerate or drizzle over other meals. Gently toss everything together to thoroughly distribute the flavors while avoiding damaging the delicate berries and greens—this keeps the salad looking bright and fresh.
Step 4: Add the Final Touches
Finish by scattering chopped walnuts and chia seeds on top. These provide a pleasant crunch and nutritious boost to your Superfood Salad with Blueberry Lemon Vinaigrette Recipe, making it not just delicious but also deeply nourishing. It is now ready to be served and enjoyed!
How To Serve Superfood Salad with Blueberry Lemon Vinaigrette Recipe
Garnishes
For an eye-catching touch, top with a few whole berries or a lemon twist. A modest sprinkle of crumbled feta or goat cheese can help boost the richness and add a tangy flavor that matches the vinaigrette well. Fresh herbs, such as mint or basil, have a refreshing scent and somewhat boost the flavor profile.
Side Dishes
This salad works well with light, summery sides like grilled chicken, roasted veggies, or a warm grain like quinoa or farro. The salad’s vivid freshness complements heartier foods wonderfully, making it an excellent choice for any meal, from casual lunches to formal feasts.
Creative Ways to Present
Serve the salad in individual glass bowls or clear plates to highlight the variety of ingredients. Layering the components in a mason jar also creates a portable and visually appealing presentation. Alternatively, arrange the salad beautifully on a big wooden board for a rustic, shared look at your next event.
Make Ahead and Storage
Storing Leftovers
If you have leftovers, keep the salad and vinaigrette separate for optimal results. Keeping the dressing off the salad prevents the greens from withering. Use an airtight container to keep your salad fresh in the fridge for up to two days.
Freezing
Because of the fresh fruits and delicate greens, freezing this salad is not recommended—the texture and flavor will not hold up. However, you may freeze any excess dressing in a small container or ice cube tray and thaw it as needed.
Reheating
This salad is best served fresh and cold, therefore reheating is not recommended. If you wish to warm leftovers, consider removing the greens and eating the toppings on their own as a warm side dish or as a mix-in to other dishes.
FAQs
Can I use greens other than arugula?
Absolutely! Spinach, kale, or mixed baby greens work well and bring distinct flavors and textures. Just be sure to adjust the dressing quantity to your preferences and the harshness of the greens.
Is it possible to prepare the dressing without a blender?
You could mash the berries and vigorously whisk the ingredients by hand, but a blender or food processor is essential for a smooth, well-emulsified vinaigrette. It makes a significant impact in the final texture.
Can I substitute walnuts?
Yes, you may replace walnuts with pecans, almonds, or even toasted pumpkin seeds for a distinct texture and flavor profile. Just remember to cut them finely for easier consumption.
How long does blueberry lemon vinaigrette last in the fridge?
The vinaigrette will last 4 to 5 days if stored in an airtight container. Separation is normal, so shake or stir it well before using.
Is this salad appropriate for meal preparation?
Definitely! Simply keep the dressing separate until ready to serve, and pack the salad ingredients in individual containers to maintain freshness and texture throughout the week.
Final Thoughts
Making and sharing this Superfood Salad with Blueberry Lemon Vinaigrette Recipe is a genuinely enjoyable experience. It’s more than just a salad; it’s a celebration of fresh, nutritious foods that work together harmoniously. I invite you to try it soon and enjoy the vibrant flavors, nutritious nutrients, and pleasing textures that have made it one of my all-time favorites. Once you do, I have a feeling this recipe will become a staple in your kitchen as well.
- Baked Tilapia with Lemon Butter Recipe

Introduction
If you’re looking for a light, flavourful dish that is both comfortable and elegant, this Baked Tilapia with Lemon Butter Recipe is a must-have. The soft, flaky fish combined with a tangy, garlicky lemon butter sauce produces a tantalising harmony that is as simple to make as it is delicious. This meal is ideal for weekday dinners or dazzling friends, since it provides bright, fresh flavours that truly perk up your taste without fuss or worry.
Ingredients You Will Need
This recipe shines because it is simple. Each ingredient brings something distinct, from the buttery richness to the fresh brightness of lemon and the pungent punch of garlic. Gathering these few things ensures a perfect combination of flavour, texture, and colour, elevating everyday meals to something spectacular.
- 4 6-oz Tilapia fillets: Select fresh, firm fillets for the most flaky texture when baked.
- 1/4 cup unsalted butter: Melts into a rich sauce that coats the fish perfectly.
- 1 medium lemon: The zest and juice provide a lively citrus flavour to the dish.
- 1 tbsp fresh parsley: Adds a bright green colour and a subtle earthy freshness.
- 2 crushed garlic cloves: Adds a savoury depth to the butter that pairs wonderfully with the lemon.
- 1 teaspoon sea salt: Brings out the natural flavours of the fish and lemon butter.
- 1/4 teaspoon black pepper: Provides a mild spice without dominating the delicate fillets.
How to Prepare Baked Tilapia with Lemon Butter Recipe
Step 1: Preheat the Oven
Start by preheating your oven to 400 degrees Fahrenheit (204 degrees Celsius). This temperature is ideal for evenly baking the tilapia, enabling it to fully cook while the lemon butter infuses it with flavour.
Step 2: Prepare Tilapia
To remove extra moisture from the fish fillets, pat them dry with paper towels. This stage allows the butter to better coat the surface and ensures a nice texture. Arrange the fillets in a single layer in a 9×13-inch baking dish to ensure proper cooking without steaming.
Step 3: Prepare the Lemon
Cut the lemon in half. From one half, zest approximately a half tablespoon and juice about one tablespoon; both will improve your lemon butter. Slice the remaining half into thin rounds to top the fish and provide delicate citrus bursts while baking.
Step 4: Prepare the Lemon Butter Sauce
Melt the butter in a small bowl in the microwave or on the stove over low heat. Remove from the fire and add the freshly squeezed lemon juice, lemon zest, crushed garlic, and chopped parsley. This combination produces a fragrant and lively sauce, which serves as the dish’s focal point.
Step 5: Brush the Tilapia with Lemon Butter
Brush the lemon garlic butter liberally over the fillets, being sure to coat both sides. Sprinkle sea salt and black pepper evenly over the fish to enhance the flavours. Then, before baking, nestle the thin lemon slices on top of the fillets, creating a gorgeous look and extra bursts of citrus with each bite.
Step 6: Bake Till Perfect
Place the dish in the preheated oven and bake for 12 to 15 minutes, depending on the thickness of the fillet. When the salmon becomes opaque and readily flaked with a fork, you’ll know it’s done. The butter should have melted, creating a glossy sauce that clings to the soft fish.
How to Serve Baked Tilapia with Lemon Butter Recipe
Garnishes
To improve the presentation, sprinkle some extra chopped fresh parsley over the baked fish. A few additional thin lemon slices on the side provide character and a pleasant citrus scent. This simple garnish not only enhances the dish’s appearance, but also provides a refreshing flavour contrast that visitors will enjoy.
Side Dishes
For a well-rounded supper, serve this vibrant Baked Tilapia with Lemon Butter Recipe with fluffy rice, quinoa, or roasted veggies. Lightly steamed asparagus or garlic sautéed green beans complement the lemony fish well, keeping the whole platter fresh and vibrant.
Creative Ways to Present
For a tropical twist, serve your tilapia over mixed greens or with a vivid mango salsa. You can also serve it as a main course at a casual supper or flake it over a snappy salad for a lighter lunch. This recipe’s adaptability allows it to shine in a variety of imaginative situations!
Make Ahead and Storage
Storing Leftovers
Once cooled, store any remaining baked tilapia in an airtight container in the refrigerator. It will stay fresh for up to two days, making it ideal for fast lunches or a simple dinner the next day.
Freezing
If you want to keep the tilapia for longer, wrap each fillet tightly in plastic wrap and then foil before freezing. This approach helps to preserve the delicate texture and flavour. To achieve the finest flavour, frozen cooked fish should be consumed within one month.
Reheating
To avoid drying out leftover baked tilapia, gently reheat it in the microwave or cover it in a low-temperature oven. Adding a small amount of water or lemon butter on top before reheating keeps the fish moist and flavourful, exactly like when it’s just baked.
FAQs
Can I Substitute Frozen Tilapia for This Recipe?
Absolutely! Simply defrost the fillets fully and pat them dry before baking for the greatest texture and flavour in your Baked Tilapia with Lemon Butter Recipe.
What Is the Best Technique to Determine When the Tilapia Is Done?
Fillets should be opaque and flake readily with a fork. Overcooking might cause them to dry out, so start monitoring after 12 minutes, depending on thickness.
Can I Substitute Different Types of Fish?
If you want to try something new, mild white fish like cod, haddock, or sole pair well with the lemon butter sauce.
Is Butter Necessary, or Can I Substitute Olive Oil?
The butter adds rich flavour and moisture that olive oil cannot imitate perfectly; but, if you like a lighter version, you can substitute olive oil, albeit the sauce will be less creamy.
Can I Make This Recipe Without an Oven?
While baking is optimal for even cooking, you can gently pan-sear the fillets on medium heat before pouring the lemon butter on top at the end. The flavours will be similar, but the textures will change slightly.
Final Thoughts
You can’t go wrong with this Baked Tilapia with Lemon Butter Recipe—simple, fresh ingredients combine to make a meal that feels as spectacular as an expensive supper out. The combination of buttery richness and vibrant lemon and garlic makes this dish one you’ll want to return to over and over. Try it tonight for a delicious, fuss-free dinner that the entire family will appreciate.
- Cherry Tomato Pasta Recipe

Introduction
This Cherry Tomato Pasta Recipe is ideal for anyone searching for a lively, cosy dish with a blast of fresh flavours. Slow-roasted cherry tomatoes produce a rich, naturally sweet sauce that clings wonderfully to soft pasta, while garlic-infused olive oil adds a warm depth. It’s deceptively simple yet wonderfully fulfilling, making it an ideal weeknight dinner or a lovely option for impressing without making a fuss. Every bite feels like a warm hug, and I can’t wait to share this favourite dish with you.
Ingredients You Will Need
The charm of this Cherry Tomato Pasta Recipe comes from its simplicity. Each ingredient is critical to creating layers of flavour, texture, and color—from juicy roasted cherry tomatoes to al dente pasta for the perfect bite. Let’s look at some cupboard items that come together so easily but produce something genuinely unique.
- Cherry tomatoes (1 pint): The core of the recipe, these juicy and sweet tomatoes transform into a delectable sauce when roasted.
- Olive oil (2 tablespoons): A fruity oil that helps to roast the tomatoes and adds richness to the finished meal.
- Garlic cloves (3 sliced): Thin slices diffuse their aroma into the oil, providing a subtle, savoury bite without being overwhelming.
- Salt and pepper (to taste) are simple ingredients that accentuate the natural flavours of the tomatoes and pasta.
- Pasta (1 pound): For this recipe, you can use spaghetti, penne, or fusilli.
How to Make Cherry Tomato Pasta Recipe
Step 1: Roast Cherry Tomatoes
Begin by arranging the cherry tomatoes in a shallow baking dish. To ensure that each tomato is flavorfully covered, gently toss them with olive oil, chopped garlic, salt, and pepper. Roast at 300ºF for approximately 60 minutes. This slow roasting brings out a deep sweetness and softens the tomatoes, causing them to almost melt into a sauce.
Step 2: Cook the Pasta
Bring a big pot of salted water to a boil about 10 minutes before the tomatoes are done roasting. Cook the pasta until it’s ideally al dente—firm to the bite yet tender and ready to absorb up the delicious tomato sauce.
Step 3: Combine and Toss
Drain the pasta thoroughly and immediately combine it with the soft roasted cherry tomatoes and garlicky oil. The heat from the pasta will help everything come together, resulting in a smooth, flavourful coating on each noodle.
How To Serve Cherry Tomato Pasta Recipe
Garnishes
Sprinkle fresh herbs like basil or parsley over your Cherry Tomato Pasta Recipe for a burst of green and a fresh aroma. A little zest or juice of lemon brightens the dish, balancing the sweetness of the roasted tomatoes beautifully.
Side Dishes
This recipe works well with a crisp green salad or garlic bread for dipping. The freshness and crunch of a salad provide a good contrast, whereas bread allows you to soak up every last drop of that delicious tomato oil.
Creative Ways to Present
Serve the pasta in warm, shallow bowls to highlight the bright reds and glossy textures of the roasted tomato sauce. Top with freshly shaved Parmesan or a drizzle of high-quality balsamic vinegar for added richness and depth.
Make Ahead and Storage
Storing Leftovers
If you have any leftovers, place them in an airtight jar in the refrigerator for up to three days. The flavours develop while the pasta sits, but the tomatoes may grow softer, so handle with care when reheating.
Freezing
This Cherry Tomato Pasta Recipe freezes best without the pasta; simply freeze the roasted tomatoes in a freezer-safe container for up to two months. To ensure the best texture and freshness, cook fresh pasta just before serving.
Reheating
Reheat gently in a skillet over low heat, adding olive oil or water as required to loosen the sauce. Microwaving pasta for an extended amount of time might cause it to dry out. Toss regularly to ensure that the pasta and sauce are equally warmed.
FAQs
Can I Use Different Varieties of Tomatoes?
Absolutely! While cherry tomatoes roast beautifully in this dish, grape or small plum tomatoes will also work well. Just keep a watch on the roasting time, as size influences how soon they soften and caramelise.
Which Types of Pasta Work Best?
Short pasta shapes, such as penne or fusilli, hold sauce well, while lengthy pastas, such as spaghetti or linguine, can provide an elegant, traditional presentation. Choose whatever you enjoy or have on hand!
Can I Make This Recipe Vegan?
Yes, when prepared as directed, this recipe is inherently vegan. To keep it vegan-friendly, simply eliminate or swap toppings such as cheese.
How Crucial Is the Roasting Time for Tomatoes?
This Cherry Tomato Pasta Recipe is distinguished by its deep, sweet flavour and silky texture, achieved through slow roasting at 300ºF for 60 minutes. Rushing the roasting process may result in less flavour and a less juicy finish.
Is This Dish Appropriate for Meal Preparation?
It’s ideal for quick dinners, but it also works well for meal planning if you prepare the pasta fresh each time. Storing roasted tomatoes separately allows you to create a varied sauce to use with various pastas throughout the week.
Final Thoughts
This Cherry Tomato Pasta Recipe is a comforting and delicious dish that never fails to liven up mealtimes. The enchantment of roasted tomatoes mixed with basic, high-quality ingredients demonstrates that sophisticated recipes aren’t necessary to create something genuinely unforgettable. Give it a try, share it with your loved ones, and prepare to enjoy a bowl of pure comfort.
- Taco Salad (Healthy, Easy Recipe) Recipe

Introduction
If you’re looking for a colourful, filling supper that comes together quickly, the Taco Salad (Healthy, Easy Recipe) Recipe is just what you need. This recipe features robust southwestern flavours combined with fresh, colourful ingredients that not only satisfy the tongue but also feed the body. Whether you’re making a quick weeknight supper or feeding guests something fun and nourishing, this taco salad finds the ideal blend of meaty and healthy with minimal effort.
Ingredients You Will Need
Getting the ingredients right is the key to making this Taco Salad (Healthy, Easy Recipe) so flavourful and texturally complex. Each component contributes its own flavour, from the savoury spiced ground beef to the crisp, refreshing lettuce and creamy avocado, resulting in a symphony of sensations that dance together in every bite.
- 1 pound ground beef: A protein powerhouse with a rich, meaty basis and substantial texture.
- 1 tsp avocado oil: A healthy fat that browns the beef and adds a mild, buttery flavour.
- 2 tbsp taco seasoning: The aromatic blend of spices gives the beef a typical southwestern flavour.
- 8 oz Romaine lettuce: This crunchy green provides freshness and a pleasing sharpness to temper the richness.
- 1 1/3 cup Grape tomatoes: These vivid tomatoes, which are juicy and sweet, add colour and flavour to the salad.
- 3/4 cup Cheddar cheese: Shredded cheese provides a melty, creamy contrast that complements the flavours beautifully.
- 1 medium avocado: Cubed for a buttery richness that blends everything together seamlessly.
- 1/2 cup green onions: Adds a little onion flavour and a burst of green colour.
- 1/3 cup Salsa: Adds a tangy, zesty bite to the salad, connecting all the fresh ingredients together with a tasty sauce.
- 1/3 cup sour cream: Provides a chilled, creamy finish that balances the intense spices and enhances each forkful.
Taco Salad Recipe (Healthy and Easy)
Step 1: Cook the Ground Beef
Begin by heating the avocado oil in a skillet on high heat. Add the ground beef and stir-fry it, breaking it up with a spatula. Continue cooking for 7 to 10 minutes, or until the beef is thoroughly browned and the moisture has evaporated. This results in a beautiful, somewhat crunchy texture and concentrated flavour in your meat.
Step 2: Add Taco Seasoning
After the beef has browned, sprinkle the taco seasoning over it and swirl well to coat every morsel with the vivid blend of spices. If you prefer your meat saucier, add 1/4 cup water and boil gently for a few minutes. This step elevates the hearty beef from simple to outstanding by infusing it with the unique taco flavours.
Step 3: Combine the Salad Ingredients
While the beef cooks, combine the chopped romaine lettuce, split grape tomatoes, shredded cheddar cheese, cubed avocado, and chopped green onions in a large bowl. When the spiced beef is ready, add it to the mixture and gently toss to combine. This fusion of ingredients combines freshness and spiciness in perfect harmony.
Taco Salad (Healthy, Easy Recipe) Instructions
Garnishes
Consider topping your taco salad with fresh garnishes such as chopped cilantro, a squeeze of lime juice for brightness, or a sprinkle of crushed tortilla chips for a satisfying crunch. These small finishing touches add layers of flavour and texture, making each mouthful a pleasant experience.
Side Dishes
This salad is delicious on its own, but if you want to make it a complete meal or share additional flavours, serve it with typical sides like handmade guacamole, warm corn tortillas or a plate of black beans. These easy additions continue the idea of freshness and robust flavours while complementing the hearty taco salad.
Creative Ways to Present
Feel like impressing your friends or simply making your supper more enjoyable? Serve taco salad in crispy tortilla bowls or halved avocado shells for a fun variation. You can also layer the ingredients in clear glass jars for a visually appealing presentation that creates suspense with each colourful layer.
Make Ahead and Storage
Storing Leftovers
If you have any leftover taco salad, keep the salad and beef mixture separate in sealed containers. This keeps the lettuce crisp and stops the salad from becoming mushy. Refrigerate and enjoy within 2 to 3 days for the best flavour and texture.
Freezing
While cooked ground beef with flavour freezes well, you should avoid freezing the entire salad because fresh items like lettuce and avocado do not freeze well. Freeze the beef in a sealed bag or container for up to 3 months, then thaw in the refrigerator when ready to eat again.
Reheating
Reheat the frozen or refrigerated taco-seasoned beef gently on the stovetop or in the microwave until it is heated throughout. Then combine it with freshly chopped lettuce and other cold salad ingredients to achieve that freshly prepared taste every time.
FAQs
Can I make the taco salad vegetarian?
Absolutely! Replace the ground beef with seasoned black beans, lentils, or a plant-based meat substitute for a wonderful vegetarian option that retains all of the robust taco flavours.
What can be used instead of avocado oil?
If you don’t have avocado oil on hand, vegetable oil, olive oil, or even a mild-flavored oil like grapeseed oil would suffice for cooking ground beef.
Is it easy to make taco seasoning at home?
Yes, you can make a simple and delicious taco seasoning mix using basic spices such as chilli powder, cumin, paprika, garlic powder, onion powder, and a bit of salt as a fresh alternative to store-bought blends.
How can I keep the salad from becoming soggy?
To keep your taco salad crisp and fresh, keep wet ingredients such as salsa and sour cream separate and add them only before serving. Also, chill the chopped lettuce and avocado until you’re ready to combine.
Can I cook this salad ahead of time for meal preparation?
This Taco Salad (Healthy, Easy Recipe) is ideal for dinner prep! Simply store the cooked and seasoned beef separate from the vegetables and cheese, and assemble your salad fresh every day to preserve bright flavours and textures.
Final Thoughts
This Taco Salad (Healthy and Easy Recipe) Recipe is one of those foods that feels like a comforting hug after a long day. It’s quick to prepare, full of nutrients, and overflowing with flavours that everyone will like. I hope you try this dish and add your own unique twists—there’s nothing better than sharing a nutritious, colourful meal with loved ones. Happy cooking!
- How To Cook Crab Legs (Easy!) Recipe

With this How To Cook Crab Legs (Easy!) Recipe, I’m going to share a tasty secret with you if you’ve ever wondered how to eat restaurant-quality crab at home. Whether you are new to cooking crab or a seasoned seafood enthusiast, these methods make the procedure simple, quick, and foolproof, delivering delicious, buttery crab legs every single time. This recipe is your go-to resource for turning a casual supper or a special occasion into a delectable seafood feast, whether it’s boiling or grilling.
Required Ingredients
This dish just requires a few basic ingredients, each of which contributes something unique, making preparation surprisingly simple. Every bite has warmth and depth because to the harmony of salt, butter, and fresh crab, which also lets the natural tastes come through.
- Crab legs (2 lb, thawed if frozen): For consistent cooking and the freshest flavor, choose thawed crab legs if they are frozen.
- Unsalted butter (1/4 cup, melted): Offers rich luxury without dominating flavors, making it ideal for brushing or dipping.
- Lemon wedges: For a cool contrast, add some fresh citrus acidity to the dish.
- Old Bay seasoning (1/4 cup, optional): This traditional seafood spice mixture brings out the crab’s inherent sweetness.
- Sea salt (4 tsp): Necessary to season the boiling or steaming water and enhance the flavor of the crab flesh.
How to Cook Crab Legs: A Simple Method
Step 1: Boil the crab legs
One of the quickest ways to keep crab legs wet and soft is to boil them. For an additional layer of flavor, add sea salt and Old Bay seasoning to a big pot or Dutch oven that has been halfway filled with water. The crab legs should be cooked for three to five minutes, or until they are very hot, after the water has reached a rolling boil. Ready to eat? Carefully move the crab legs to a serving plate using tongs.
Step 2: Steam the crab legs
Steaming is the best option if you want a delicate cooking technique that keeps more of the natural sweetness. Just enough water to keep the steamer basket from being immersed should be added to a big pot. After bringing the water to a boil, put the basket with the crab legs inside, cover with a lid, and steam until well heated, about 6 to 8 minutes. This technique produces incredibly flavorful, exquisitely tender crab meat.
Step 3: Broil the crab legs
If you prefer a buttery coating and a little crispy edge, broiling crab legs is a fantastic choice. Place the crab legs in a single layer on a baking pan and preheat the oven to broil. After liberally brushing them with melted butter, position the sheet six to seven inches away from the broiler. They should be hot and lightly browned after 3 to 4 minutes of cooking on each side. Your mouth will water just from the scent!
Step 4: Bake the crab legs
You can cook a bigger batch of crab legs with less trouble when you bake them. Place the crab legs evenly on a baking pan and preheat the oven to 375°F (190°C). Before baking, brush them with melted butter to keep the meat tender. Serve right away to enjoy the juicy, buttery richness after baking for 15 to 20 minutes in the center of the oven.
Step 5: Grill the crab legs
With a hint of smoke and a slightly crunchy shell, grilling elevates crab legs to a new level. Put the crab legs on the grill after brushing them well with melted butter and preheating the grill to medium-high heat. To ensure they are evenly heated and have a lovely char, cover and cook for 5 to 7 minutes on each side. This technique gives the dish amazing depth and is ideal for summertime get-togethers.
How to Cook and Serve Crab Legs (Easy!) Recipe
Add-ons
The key to serving crab legs is to bring out their inherent flavors without overpowering them. A traditional addition, fresh lemon slices provide a citrus sharpness that contrasts with the buttery richness. For a modest flavor boost and a splash of color, you can also add a small amount of freshly chopped parsley or paprika. It’s essential to have a small basin of melted butter for dipping!
Side dishes
It’s best to serve crab legs with light, complimentary sides because they’re already rich and savory. Try roasted potatoes with garlic, buttery corn on the cob, or a fresh green salad dressed with a lemon vinaigrette. To absorb any remaining butter and liquids, a side of crusty bread is fantastic. These easy sides fill out the dinner perfectly without stealing the spotlight.
Innovative Methods for Presenting
Serve your crab legs on a big dish covered with fresh greens or crushed ice to make them the focal point of a seafood feast. For a rustic yet sophisticated appearance, you can also bundle crab legs in parchment paper packets with slices of lemon and herbs. Serve them in small cast-iron skillets with melted butter for a fun variation, or serve them with a zesty seafood cocktail sauce for a variety of dipping options.
Preparation and Storage
How to Store Remaining Food
You may keep leftover crab legs in the fridge for up to two days if you put them in an airtight container. Until you’re ready to reheat, don’t wash them to preserve the greatest flavor and texture. To keep it from drying out, store it on a piece of moist paper towel.
Freezing
Freezing is a good way to extend the shelf life of crab legs. Put them in a freezer-safe bag or container after carefully wrapping them in aluminum foil or plastic wrap. Properly frozen crab legs can last up to 3 months without substantial loss of flavor or texture.
Warming up
Crab legs can be reheated in the oven at 350°F (175°C) while wrapped in foil, or they can be gently steam-cooked for about five minutes. Steer clear of the microwave since it tends to dry up the meat. Maintaining their delicate succulence while keeping them warm is crucial.
FAQs
Can I make this recipe with frozen crab legs?
Of course! Thawed frozen crab legs are ideal and frequently the most practical choice. To guarantee uniform heating and optimal texture, just make sure they are fully thawed before cooking.
Does flavor require Old Bay seasoning?
Although it’s optional, Old Bay seasoning adds a traditional seafood spice. Crab legs still taste great when cooked with simply butter and sea salt. But many people adore Old Bay’s nostalgic, somewhat peppery flavor.
What is the best way to cook crab legs?
Your own tastes will determine that! Broiling gives a little crispness, grilling adds smokey depth, and boiling is rapid and keeps the meat delicate. Feel free to try several methods and discover your favorite; they all produce wonderful crab legs.
How can I tell whether the crab legs are done?
Generally, crab legs come pre-cooked, so you’re basically just warming them. They are ready to consume when they are consistently steaming hot, which can take anywhere from three to eight minutes, depending on the approach. Watch the time because overcooking might make the meat tough.
Can I consume the crab legs’ shells?
Cracking open the shell is part of the enjoyment, but it’s not edible! To get the soft, delicious meat within, use kitchen shears or seafood crackers. For a genuinely realistic seafood experience, don’t be afraid to delve in with your fingers.
Final Thoughts
Warm, buttery crab legs are unquestionably delicious, and this How To Cook Crab Legs (Easy!) Recipe will give you the confidence to make them flawlessly every time. Your taste buds will be delighted whether you stick to traditional boiling or take a chance with grilling. Get your loved ones together, get your hands dirty, and savor the delight of opening some delicious fish at home!
- Chicken Fritters (Easy & Healthy) Recipe

You just found your new favorite food if you want one that is full of flavor, healthful, and easy to make. This easy and healthy Chicken Fritters recipe mixes delicate, finely diced chicken with a mix of cheeses and fresh herbs, then lightly fries them until they are golden brown. Each mouthful has a great mix of crispy edges and juicy, tasty middle, making it a great choice for family dinners or casual get-togethers. You can trust me: these fritters will quickly become one of your favorite recipes.
Things You Will Need
This recipe’s charm derives from a few basic but important things. Each one is very important for getting the right texture, providing taste, and making the fritters look so good with their golden hue.
- Chicken breast (2 lb, coarsely diced): The main part of the dish, it gives it a soft bite and lean protein.
- Shredded mozzarella cheese (1 cup): Adds creaminess and meltiness that keeps the fritters moist.
- Grated Parmesan cheese (1/4 cup): Adds a nutty sharpness that really brings out the taste.
- Blanched almond flour (1/4 cup): A healthy, gluten-free binder that keeps the fritters light but still holds them together.
- Fresh chives (3 tablespoons or more): Adds a soft oniony brightness—the more, the better.
- Large eggs (2): Needed to hold the fritters together and keep their shape.
- Garlic powder (1/2 tsp): Adds a hint of delicious taste.
- Sea salt (1/2 tsp or less): The exact amount to bring out all the flavors without dominating them.
- Black pepper (1/4 tsp): Adds a little spice that wakes up the taste buds.
- Olive oil (2 tbsp): The beneficial fat that makes the fritters’ crust turn golden brown when they are fried.
How to Make Easy and Healthy Chicken Fritters
Step 1: Combine your ingredients
In a big bowl, mix together the finely chopped chicken, shredded mozzarella, grated parmesan, almond flour, fresh chives, eggs, garlic powder, salt, and pepper. Mix everything together until all the parts are mixed in well. This is the step where the fritters come together, so take a minute to make sure they are all mixed properly.
Step 2: Place the mixture in the refrigerator.
Wrap the bowl tightly in plastic and put it in the fridge for at least an hour. The almond flour will soak up moisture during this time, and the flavors will blend together. This will make the mixture hard enough to mold easily. If you plan ahead, letting it sit overnight will make the flavor even stronger.
Step 3: Fry till golden brown
Put olive oil in a large frying pan and turn the heat up to medium. Put pieces of the chicken mixture into the skillet with a 1/4 cup scoop. Use a spatula to carefully flatten each scoop to a thickness of 1/4 to 1/3 of an inch. Fry the fritters for 3 to 4 minutes on each side, or until they are cooked all the way through and have a beautiful golden-brown crust. When they’re done, move them to a dish with paper towels on it to soak up the extra oil.
Step 4: Do it again and have fun
Fry the rest of the chicken mixture in stages, making sure your skillet stays well-oiled and not too full. At this point, the smell will be too good to resist. For the greatest taste and texture, serve warm.
How to Serve Chicken Fritters: An Easy and Healthy Recipe
Garnishes
These fritters enjoy a crisp finishing touch. Season with additional chopped chives or freshly ground black pepper. A dollop of Greek yogurt or a splash of fresh lemon juice provides zing and a creamy contrast that complements the fritters perfectly.
Side Dishes
For a well-rounded lunch, serve your Chicken Fritters (Easy & Healthy) Recipe alongside crisp green salads, steamed veggies, or a refreshing cucumber and tomato salad. Roasted sweet potatoes and a light quinoa salad are also excellent accompaniments, keeping the dinner healthful but fulfilling.
Creative ways to present
If you’re hosting, offer these fritters as finger food with dips like tzatziki, avocado crème, or smoked chipotle mayo. They also make delicious slider patties when sandwiched between mini buns with lettuce and tomato for an elevated twist.
Make Ahead and Storage
Storing leftovers
Once cooled to room temperature, transfer any leftover fritters to an airtight container and refrigerate. They stay fresh for 3 to 4 days, making them excellent for fast lunches or snacks throughout the week.
Freezing
Chicken fritters freeze beautifully. Place them in a single layer on a baking sheet, then freeze until frozen. Put in a bag or container that can go in the freezer. They will keep in the freezer for up to two months without losing flavor or consistency.
Reheating
To achieve the finest results, reheat frozen or refrigerated fritters in a skillet over medium-low heat to restore their crispy skin. Alternatively, reheating them in an oven at 350°F (175°C) for about 10 minutes is effective. Don’t microwave them because it will make them mushy.
FAQs
Can I use ground chicken instead of chopped chicken breasts?
Yes, ground chicken can serve as a substitute. Just keep in mind that the texture will be slightly different—the fritters may be softer and less chunky, but they will still be wonderful.
Is almond flour necessary, or can I substitute ordinary flour?
Almond flour keeps these fritters gluten-free while adding a mild nutty flavor. You can use ordinary flour if you like, but it will alter the texture significantly, making them less soft.
Can the chicken fritters be baked instead of fried?
Absolutely! For a lighter option, bake the fritters on a prepared baking sheet at 400°F (205°C) for 15–20 minutes, flipping halfway, until golden and cooked through.
How can I tell when the chicken fritters are properly cooked?
Fritters should be golden brown on all sides and have an interior temperature of 165°F (74°C). Cutting one open to ensure the chicken is opaque and no longer pink is another acceptable method of determining when they’re done.
Can I use different herbs or spices in the recipe?
Definitely! Fresh parsley, dill, or a dash of smoked paprika can enhance the flavor profile significantly. You can modify the spices to make them taste better.
Final Thoughts
These Chicken Fritters (Easy & Healthy) Recipe are delicious, healthful, and simple to prepare, making them a lot of fun. They’re an excellent way to get dinner on the table while preserving flavor and nutrition. Give them a try and see how quickly they become a favorite in your recipe collection. I promise that your entire family will appreciate it!
- Hibachi Chicken with Fried Rice and Vegetables Recipe

This recipe for Hibachi Chicken with Fried Rice and Vegetables is perfect if you’ve ever wanted the delectable flavors of a Japanese steakhouse delivered straight to your home. Tender chicken, properly seasoned fried rice, and sautéed vegetables oozing with savory flavor are all nicely balanced in this colorful one-pan supper. Whether you’re cooking for family or friends, this recipe is both approachable and impressive, making it a go-to favorite for any weeknight or informal event.
Required Ingredients
The basic yet necessary components in this recipe for Hibachi Chicken with Fried Rice and Vegetables are what make it so magical. Each ingredient contributes a unique flash of flavor, texture, or color, all of which come together to produce a delectably filling dish that is both vibrant and delicious.
- Olive oil: The base for a beautiful sear and a mild, fruity flavor when sautéing anything.
- Boneless, skinless chicken breasts: For quick cooking and delicious nibbles, cut boneless, skinless chicken breasts into bite-sized pieces.
- Unsalted butter: Gives everything a silky touch and richness.
- Reduced-sodium soy sauce or coconut aminos: A savory, somewhat sweet spice that adds authenticity.
- Sea salt and black pepper: Simple ingredients that enhance the flavor of the chicken and vegetables.
- Carrots and frozen peas: Quick-cooking veggies that offer bursts of color and sweetness.
- Garlic (optional): Gives the fried rice a burst of flavor and a rich scent.
- Egg: For added texture and protein, scramble the egg into the rice.
- Cooked white rice: Perfectly reheated and ready to absorb flavors, cooked white rice serves as the traditional, fluffy foundation for fried rice.
- Toasted sesame oil: A last touch that adds a distinctive hibachi feel and a nutty scent.
- Zucchini: Vibrant, soft vegetables that absorb all the delectable umami in the meal.
- Yellow onion: When caramelized, yellow onion adds a hint of sweetness and bite.
- Cremini mushrooms: Earthy mushrooms that add a lot of texture and intricacy.
- Spicy mayo: A rich finishing sauce and the ideal creamy dip with a spice.
- Sesame seeds and green onions (optional): Optional garnishes that add some bite and a bright color contrast.
How to Make Hibachi Chicken with Fried Rice and Vegetables
Step 1: Prepare the chicken
To help the chicken pieces obtain that beautiful sear, start by patting them dry. Add the chicken, butter, and soy sauce or coconut aminos to a large skillet that has been heated with a tablespoon of olive oil over medium heat. Add plenty of salt and pepper for seasoning. Cook the chicken for about 5 to 8 minutes, rotating regularly, until the chunks are browned and cooked through to an internal temperature of 165°F. When finished, move to a dish and keep warm while you finish preparing the remaining ingredients.
Step 2: Get the fried rice ready
Heat another tablespoon of olive oil in the same skillet over medium-high heat (no need to wash another pan). Add the frozen peas and carrots and let them soften for about three minutes. To release the aromatic goodness of the garlic, add it now and stir quickly for about 30 seconds. After pushing the vegetables aside, crack in the egg and gently scramble until cooked through. Add the cooked rice, butter, and additional soy sauce or coconut aminos. Allow everything to cook for three to five minutes, cooking the rice thoroughly and combining the flavors. For a true hibachi flare, top with toasted sesame oil. Transfer to a bowl and cover to keep warm.
Step 3: Cook the veggies
Once more, put a tablespoon of olive oil in the same skillet over medium-high heat. Add the mushrooms, onions, zucchini, butter, and soy sauce or coconut aminos. Stir-fry these until they get soft and brown, about 5 to 8 minutes. By caramelizing the veggies, the butter brings forth their inherent sweetness and harmonizes with the savory sauce.
Step 4: Combine Everything
Place the colorful sautéed vegetables, hot fried rice, and succulent hibachi chicken on plates or in large bowls. Add sesame seeds and chopped green onions on top if you’re feeling very indulgent. Serve with a side of spicy mayo for dipping, which adds a tangy, creamy touch that wonderfully balances all the flavors.
How To Serve Hibachi Chicken with Fried Rice and Vegetables Recipe
Garnishes
Simple garnishes, like as chopped green onions and toasted sesame seeds, are game changers. They add fresh bursts of flavor and a little crunch, elevating the presentation and taste. A dollop of spicy mayo on the side offers a creamy spice that complements both the chicken and the vegetables.
Side Dishes
This dish can be served on its own, but if you want to add something more, try a light cucumber salad or miso soup. These sides provide a pleasant contrast, balancing the richness of the butter and soy sauces with cool, crisp flavors.
Creative ways to present
Serve this hibachi feast family-style on a large platter, allowing everyone to dig in and share. Alternatively, filling crispy lettuce leaves with chicken, rice, and vegetables can make it a delightful, hand-held snack. This meal is sure to be a crowd-pleaser no matter how it is presented.
Make Ahead and Storage
Storing leftovers
Leftover Hibachi Chicken with Fried Rice and Vegetables Recipe can be refrigerated for up to three days in an airtight container. The flavors actually develop overnight, resulting in a fantastic supper the next day.
Freezing
If you wish to save some for later, freeze the chicken, rice, and vegetables in separate freezer-safe containers for up to two months. Be aware that veggies such as zucchini may lose texture when thawed but retain flavor when reheated.
Reheating
For optimal results, gently reheat in a skillet over medium heat with a splash of water or oil to avoid drying out. Stir often to ensure that everything is evenly warmed and that the flavor and texture remain fresh off the grill.
FAQs
Is it possible to substitute cauliflower rice for white rice?
Absolutely! Cauliflower rice is an excellent low-carb substitute that pairs well with this meal. Simply adjust the cooking time slightly because it doesn’t take as long to heat completely.
Is coconut aminos a decent replacement for soy sauce?
Yes, coconut aminos have a little sweeter, less salty flavor and are an excellent choice for people seeking a soy- or gluten-free alternative without compromising umami.
Can I make this recipe vegan?
To make the dish vegan, substitute the chicken with tofu or tempeh, add vegan butter, and eliminate the egg. Make sure your soy sauce and coconut aminos are vegan!
Which type of mushrooms should I use?
Cremini mushrooms are ideal for this recipe because they have a nice earthiness and meaty texture, but you can also use button mushrooms or shiitake mushrooms, depending on your preferences.
How spicy is the dish with spicy mayonnaise?
The spicy mayo provides a subtle spice, but you can easily adjust how much you use on the side. You may also make your own by combining mayonnaise with sriracha or chili sauce to adjust the spiciness.
Final Thoughts
There is something extremely rewarding about taking the restaurant experience home, and this Hibachi Chicken with Fried Rice and Vegetables Recipe does it in a simple, crowd-pleasing way. It’s fresh, tasty, and enjoyable to prepare—a dependable kitchen win you’ll want to repeat time and again. Give it a try, and it will quickly become a favorite in your cooking cycle!
- Healthy Fudgesicles Recipe

If you’re looking for a tasty dessert that won’t jeopardize your healthy eating objectives, this Healthy Fudgesicles Recipe is the answer. These fudgesicles are creamy, thick, and decadently chocolatey, satisfying your sweet taste without any guilt. These frozen treats, made with simple, healthful ingredients such as Greek yogurt and unsweetened almond milk, perfectly combine nutrition and indulgence. Whether you’re cooling off on a hot day or seeking for a healthy dessert alternative, these fudgesicles are a game changer.
Ingredients You Will Need
The brilliance of this Healthy Fudgesicles Recipe resides in its simple but potent ingredients. Each plays an important role, from adding creaminess and chocolate depth to balancing sweetness and increasing taste diversity.
- 1.5 cups nonfat plain Greek yogurt: Provides a creamy texture and a protein boost with a tangy flavor.
- 1 cup unsweetened almond milk: Keeps the fudgesicles smooth and light, without dominating the chocolate flavour.
- 1/2 cup unsweetened cocoa powder: Provides rich, natural chocolate flavor without adding sugar.
- 1/3 cup maple syrup: provides a natural, warm sweetness that matches the cocoa well.
- 1.5 tsp vanilla extract: improves the overall flavor by adding depth and a faint fragrant touch.
- 1/16 tsp kosher salt: Balances sweetness and improves chocolate flavor, creating an enticing taste.
How to Make Healthy Fudgesicles
Step 1: Blend the ingredients
Begin by blending Greek yogurt, unsweetened almond milk, chocolate powder, maple syrup, vanilla extract, and kosher salt in a blender. Blend everything until it’s absolutely smooth and creamy. This step is essential for creating the silky fudgesicle texture that melts on your tongue.
Step 2: Taste and adjust sweetness
After combining, take a time to taste the result. If you like it sweeter, add a little extra maple syrup. This customizable process ensures that each fudgesicle is exactly tailored to your taste buds—so versatile and simple!
Step 3: Pour into moulds
Next, carefully pour the delectable chocolate mixture into the popsicle molds. Leaving a small gap at the top allows the mixture to expand when freezing, eliminating spills and splits.
Step 4: Freeze and Insert Sticks
Cover the molds and place the popsicle sticks into each one. To ensure that the fudgesicles are solid, freeze them for at least 8 hours, preferably overnight. When ready to eat, run the popsicle molds under warm water for 5 to 10 seconds to soften the edges and make removal easier.
How To Serve Healthy Fudgesicles Recipe
Garnishes
Add a variety of decorations to your fudgesicles to make them more special. A sprinkle of chopped nuts, such as almonds or walnuts, provides a delightful crunch. Fresh berries or a few shavings of dark chocolate on top can make each bite feel more special and attractive. A small sprinkle of almond butter or coconut flakes adds a delicious finishing touch.
Side Dishes
For an enticing snack or dessert, combine your Healthy Fudgesicles with a bowl of fresh fruit salad or a dollop of whipped coconut cream. These sides balance out the chocolatey richness of the fudgesicles while remaining refreshing.
Creative ways to present
Thinking beyond the traditional popsicle mold? For a more whimsical effect, freeze this mixture in fun-shaped silicone molds. To create unique textures inside each bite, cover the fudgesicle foundation with crushed nuts or bite-sized fruit pieces before freezing. Serving them in colorful cups with a straw for a fudgy chocolate float is another fun option that both kids and adults will enjoy.
Make Ahead and Storage
Storing leftovers
If you end up with extra healthy fudgesicles, don’t worry. To minimize freezer burn and undesirable aromas, store them in an airtight container or carefully covered in popsicle molds. They’ll keep fresh and delicious for up to two weeks, ready to go whenever you want a guilt-free treat.
Freezing
The best part about this Healthy Fudgesicles Recipe is how nicely it freezes. When poured and frozen solid, these fudgesicles retain their creamy texture and rich flavor. To achieve the optimum consistency, freeze on a flat surface and cover the molds to prevent freezer odors from transferring.
Reheating
Fudgesicles are best consumed frozen, so reheating is unnecessary. If you prefer a softer texture, allow them to remain at room temperature for a few minutes before eating. This minor thawing helps the fudgy flavor to peek through without turning into a sloppy puddle.
FAQs
Can I use other types of milk in this recipe?
Absolutely! While unsweetened almond milk is suggested for its lightness and subtle flavor, you can use oat milk, soy milk, or even dairy milk if you like. Simply keep it unsweetened to retain the proper balance.
Are these fudgesicles suitable for children?
Definitely! This Healthy Fudgesicles Recipe contains natural ingredients and avoids refined sugars, making it a kid-friendly treat that parents can feel good about. Just keep an eye on portion amounts and eat as part of a healthy diet.
Can I make the fudgesicles vegan?
Yes, simply replace the Greek yogurt with a plant-based yogurt alternative such as coconut or almond milk yogurt. This change maintains the creamy texture without sacrificing flavor, making it ideal for vegan diets.
How do I prevent ice crystals from forming in my fudgesicles?
Greek yogurt and almond milk, due to their natural creaminess, help decrease ice crystals. Additionally, carefully combining the mixture and freezing it uniformly can help eliminate undesirable frosty textures. Moisture can be kept out of the molds by carefully covering them.
Is it possible to incorporate protein powder into the recipe?
For a protein boost, add a scoop of your favorite chocolate or vanilla protein powder. Simply combine it thoroughly with the remaining ingredients before freezing. Adjust the sweetness accordingly, as some powders might impart their own flavor or sweetness.
Final Thoughts
Giving this Healthy Fudgesicles Recipe a try means indulging in something that is actually beneficial for you. It’s a refreshing, uncomplicated, and extremely gratifying way to consume chocolate without feeling guilty. I promise that once you make these fudgesicles, they will become one of your favorite go-to snacks, whether you share them or eat them all by yourself. So take your blender and molds and embark on this delightful journey of healthy chocolate happiness!
- Chocolate Chia Pudding Recipe

If you’ve ever desired a healthy, tasty dessert or breakfast that virtually prepares itself, you’re going to adore this Easy Chia Seed Pudding Recipe. It’s stunningly simple yet full of taste and texture, made with creamy milk and tiny chia seeds that swell into a pleasant, pudding-like consistency. This pudding, sweetened moderately with maple syrup and flavored with vanilla, strikes the ideal balance between enjoyment and health. Whether you need a quick morning boost or a guilt-free treat, this recipe always delivers tremendous flavor with little effort.
Ingredients You Will Need
This recipe is simple and uses only a few pantry staples, each of which adds a unique flavor, sweetness, and texture to the pudding. You’ll be shocked at how simple items can morph into something so delicious.
- 1 cup milk (or milk substitute): Provides a creamy basis for hydrating the chia seeds and creating the delectable pudding texture.
- ¼ cup chia seeds (measured level): Add ¼ cup chia seeds (measured level) to achieve the desired thick, gel-like consistency.
- 2 tablespoons maple syrup (or preferred sweetener): Provides just the proper amount of natural sweetness to keep each bite enjoyable without being overbearing.
- ½ tsp vanilla extract: adds a soothing scent and depth to the pudding, enhancing its flavor.
- A dash of sea salt (1/8 tsp or less, optional): enhances all of the flavors while making the sweetness more bright and balanced.
How To Make Easy Chia Seed Pudding
Step 1: Combine the ingredients in a jar
Begin by placing your milk, chia seeds, maple syrup, vanilla essence, and salt in a jar with a tight-fitting cover. A 16-ounce or larger jar works best here. This phase is all about preparing the stage for the magical pudding texture to emerge.
Step 2: Shake vigorously
Seal the jar and vigorously shake it for approximately one minute. This agitation is important because it separates the chia seeds so they don’t clump together and keeps them equally suspended in the liquid, resulting in a smooth, creamy consistency.
Step 3: Refrigerate and shake occasionally
Place the jar in the refrigerator for at least an hour, preferably overnight for optimal results. During the first hour, give it another good shake every 20 minutes to keep troublesome clumps at bay and achieve that beautiful texture that everyone likes.
Step 4: Serve with your favorite toppings
Once set, your pudding is ready to eat. Feel free to drizzle with more sweetness or top with fresh fruits, nuts, coconut flakes, or shaved chocolate. The topping possibilities are limitless and quite tasty.
How to Serve the Easy Chia Seed Pudding Recipe
Garnishes
Adding the perfect garnish elevates this pudding from simple to amazing. Fresh berries, banana slices, toasted coconut, or a sprinkling of cinnamon can all add fresh levels of flavor and texture. Nut butters or chopped nuts provide a delightful crunch and richness that complements the creamy pudding perfectly.
Side Dishes
Because this pudding is inherently light but hearty, it pairs well with protein-rich sides such as almonds or a dollop of Greek yogurt. If you want to make it a more substantial meal, pair it with your favorite smoothie or a warm slice of whole grain bread.
Creative ways to present
Serving your chia seed pudding in clear glasses or mason jars highlights the lovely, jelly-like layers, making your treat or breakfast feel especially special. Layer it with fruit compote or granola to make a parfait. If you’re entertaining friends, you may even pipe whipped coconut cream on top for an extra touch of elegance!
Make Ahead and Storage
Storing leftovers
This pudding stores nicely in the fridge for up to five days, making it perfect for meal prep or quick breakfasts throughout the week. Simply keep it well wrapped to preserve freshness and texture.
Freezing
While freezing is an option, it may impact the texture because chia seeds gel up with liquid. If frozen, expect a softer, less creamy consistency when thawed. This Easy Chia Seed Pudding Recipe is best served fresh or chilled, however freezing is an option if you want to experiment.
Reheating
Chia pudding is normally eaten cold or at room temperature, thus reheating is unnecessary and may alter the texture negatively. If you want it warm, gently microwave a little bit with a splash of milk, stirring well to keep the smoothness.
FAQs
Can I substitute a different sweetener in the Easy Chia Seed Pudding recipe?
Absolutely! To suit your taste, you can substitute maple syrup for honey, agave nectar, or a sugar-free sweetener such as stevia. Simply adjust the amounts to taste because sweetness levels vary.
Which type of milk works best?
Any milk or milk substitute works well in this recipe. Cow’s milk, almond, oat, and coconut milk all have unique flavors and creaminess levels. Select what you appreciate the best or have on hand!
How long does it take for the chia seeds to completely absorb the liquid?
Chia seeds typically take about an hour to absorb liquid and thicken appropriately, but for the greatest texture, leave them in the fridge overnight. This creates a smooth, pudding-like consistency.
Can I add flavors or mix-ins to my pudding?
Definitely! Cinnamon, cocoa powder, and matcha powder all work well together to provide a variety of flavor profiles. To add texture and taste, mix in pureed fruit or shredded coconut after soaking.
Is this dish appropriate for vegans?
Yes, just use plant-based milk and a vegan sweetener like maple syrup or agave nectar. This Easy Chia Seed Pudding Recipe is both vegan-friendly and versatile.
Final Thoughts
This Easy Chia Seed Pudding Recipe is one of those delectable foods that is both decadent and nutritious. It’s easy to make, adaptable, and full of healthy ingredients, making it a go-to recipe. So go ahead and try it; your mornings (and dessert desires) will thank you!
- Healthy Chicken Shawarma Quinoa Bowls Recipe

Nothing beats a supper that is both rich and fulfilling, and this Healthy Chicken Shawarma Quinoa Bowls Recipe delivers on both counts. It’s a vivid, colourful bowl full of delicate spiced chicken, fluffy quinoa, fresh vegetables, and a delectable homemade tahini sauce that brings everything together perfectly. This meal embodies the flavours of Middle Eastern street food while being light and wholesome, making it ideal for a filling lunch or dinner that will leave you feeling energised and joyful.
Ingredients You Will Need
Each ingredient in this recipe has been carefully picked to provide the ideal combination of flavour, texture, and nutrition. These simple yet vivid elements combine to create a dish that is as visually beautiful as it is palatable.
- 1 cup dried quinoa: Quinoa serves as the foundation for our bowl, adding a nutty flavour and a protein punch to round out the meal.
- 2 boneless/skinless chicken breasts: Tender and lean, these absorb up the shawarma spices well.
- 1 clove garlic (smashed and minced): Brings a warm, aromatic depth to the marinade and sauce.
- 2 tablespoons extra virgin olive oil (divided): Adds richness while cooking and marinating the chicken.
- The juice of 1/2 a lemon adds a tangy sharpness to the spices and vegetables.
- 1 teaspoon ground cumin: The heart of shawarma’s earthy spice mix.
- 1/2 teaspoon smoked paprika: Provides a slight smoky sweetness to the chicken.
- 1/4 teaspoon ground turmeric: Provides a golden colour and subtle warmth.
- 1/8 teaspoon cayenne pepper: Just enough to add a hint of spice without overpowering.
- 2 naan flatbreads: Perfect for scooping or offering as a texture contrast.
- 1/4 small red onion provides sharpness and crunch to contrast the mellow quinoa.
- 1/2–3/4 bell pepper (red or green): A sweet and colourful addition to your fresh vegetables.
- 1/2 English cucumber: A cool and refreshing way to lighten up the bowl.
- 1 cup grape tomatoes: A juicy rush of sweetness.
- One lemon’s juice is used in the fresh vegetable dressing to provide brightness.
- 2 tablespoons olive oil: To coat the vegetables with silky smoothness.
- 1–2 tablespoons finely chopped parsley: Adds fresh herbal flavours and a pop of vibrant green.
- 1/4 cup tahini: The creamy base of the trademark sauce, which enhances the dish.
- 3 tablespoons warm water: Thins the tahini into a lovely drizzleable sauce.
- To season, use salt, black pepper, and paprika. These simple seasonings work well together.
How to Prepare Healthy Chicken Shawarma Quinoa Bowls Recipe
Step 1: Toast and cook the quinoa
Rinsing the quinoa is essential for eliminating any natural bitterness. Toasting it lightly in a skillet is an optional but excellent way to improve its nuttiness and texture. Once toasted, cook the quinoa in water until fluffy and soft, offering the strong foundation your colourful dish deserves.
Step 2: Prepare your fresh vegetables
While the quinoa cooks, chop the onion, bell pepper, cucumber, and parsley. Fresh ingredients are essential—they add crispness, beautiful colours, and invigorating flavours to every bite. Remember to halve those lovely grape tomatoes and mince garlic for the dressing!
Step 3: Flatten the chicken to ensure even cooking
Patting the chicken dry and pressing it to a 1/4-inch thickness is essential. This promotes speedy, even cooking and allows the shawarma spices to sink in thoroughly, resulting in the juiciest, most flavourful chicken.
Step 4: Marinate the chicken with shawarma spices
In a shallow bowl or resealable bag, mix the fragrant spices (cumin, paprika, turmeric, and cayenne) with the garlic, lemon juice, and olive oil. Coat the chicken generously with this mixture and allow it to sit for at least ten minutes to absorb all of the unusual scents, which elegantly balance citrus, spice, and richness.
Step 5: Season and fluff the quinoa
When the quinoa is done, fluff it gently with a fork and season with salt and pepper to taste. This is a key step because it keeps the quinoa light and enables its chewy texture shine through without becoming mushy or boring.
Step 6: Cook the chicken to juicy perfection
Heat olive oil in a pan over medium heat, then fry your seasoned chicken breasts until they reach 165°F and have a beautiful golden crust. After cooking, let the chicken rest for a few minutes to allow the fluids to settle, resulting in soft, flavourful pieces for your bowl.
Step 7: Toss the vegetables with Lemon Dressing
In a mixing bowl, add the chopped onion, bell pepper, cucumber, tomatoes, and parsley. Dress them with fresh lemon juice and olive oil, seasoning well to bring out their natural flavours and produce a vibrant, zesty salad that complements the shawarma chicken perfectly.
Step 8: Mix the Creamy Tahini Sauce
The tahini sauce acts as a binding agent for the entire bowl. Combine tahini, lemon juice, minced garlic, and warm water; season with salt, pepper, and paprika. Adjust the water gradually until you have a smooth, creamy drizzle that is ideal for slathering over your bowl.
Step 9: Slice the chicken
Cut the rested chicken into thin strips or bite-sized pieces, as you choose. This makes the dish easier to scoop and eat, with each forkful containing a well-balanced blend of chicken, quinoa, and fresh vegetables.
Step 10: Assemble and enjoy
You can serve the components individually or combine the quinoa and vegetables before adding the chicken and tahini sauce on top. In any case, this delectable Healthy Chicken Shawarma Quinoa Bowls Recipe will provide an explosion of satisfying flavour with each bite.
How To Serve Healthy Chicken Shawarma Quinoa Bowls Recipe
Garnishes
Fresh herbs, such as chopped parsley, or a sprinkle of sumac or za’atar, make excellent garnishes, giving both brilliant freshness and mild flavour. A lemon slice on the side is also a nice touch for anyone who prefers a bit more zing.
Side Dishes
Serve your bowl with warm naan or pita bread to scoop up and enjoy every drop of tahini sauce. A simple side of roasted vegetables or a crisp green salad complements the main course without taking away from it.
Creative ways to present
For a stunning display, top your dish with quinoa, vegetables, chicken, and a generous drizzle of tahini. Alternatively, serve all ingredients separately so that everyone may create their own bite.
Make Ahead and Storage
Storing leftovers
Quinoa bowls keep beautifully in an airtight container in the fridge for up to three days. Keep the tahini sauce separate, if feasible, to avoid sogginess. This makes for an easy, healthful lunch that reheats quickly.
Freezing
Chicken shawarma keeps well on its own, although quinoa and fresh vegetables may lose texture when thawed. For optimal results, freeze the chicken strips in a sealed container for up to two months, then cook fresh quinoa and salad when ready to serve.
Reheating
Warm the chicken gently in a skillet or microwave until fully cooked. To reheat quinoa, sprinkle with water and microwave covered for a minute or two to restore moisture. For the finest flavour and texture, add fresh vegetables and tahini sauce right before serving.
FAQs
Can I substitute brown rice for quinoa?
Absolutely! Brown rice is an excellent replacement; however, it takes longer to cook and has a little chewier texture. Adjust the cooking time accordingly to enjoy a heartier grain foundation.
Is the recipe spicy?
The spice level is relatively modest, with only a pinch of cayenne pepper to add warmth. If you prefer it spicier, simply add additional cayenne or red pepper flakes.
Can I make this dish vegetarian?
Yes! Replace the chicken with grilled or roasted spicy chickpeas or tofu, then follow the same seasoning and cooking instructions. The tahini sauce and fresh vegetables make it deliciously tasty.
How long does the chicken marinate?
For this dish, a quick 10 minutes at room temperature is sufficient, but if you want a stronger flavour, marinate it in the fridge for up to 24 hours. Simply bring it back to room temperature before cooking to ensure consistent cooking.
What is the best method for storing tahini sauce?
Refrigerate tahini sauce in an airtight jar for up to a week. If it thickens, whisk in a little warm water to restore the creamy smoothness before serving again.
Final Thoughts
This Healthy Chicken Shawarma Quinoa Bowls Recipe is one of those delicious dinners that feels like a treat while still providing you with nutrients. It’s easy to prepare, full of flavour, and adaptable to a wide range of tastes and lifestyle preferences. I encourage you to plunge in, play about with your favourite vegetables and spice levels, and share this colourful bowl of happiness with friends and family. You might end up making it again and again!
- Tuna Pasta with Lemon, Capers, and Parmesan Recipe

If you’re looking for something both fresh and cosy, the Tuna Pasta with Lemon, Capers, and Parmesan Recipe is just what your evening dinners have been missing. This delectable meal wonderfully blends sharp citrus aromas with the salty punch of capers and the creamy richness of Parmesan, all anchored by soft pasta and substantial tuna. It’s quick to prepare, extremely flavourful, and has a magical ability to transform ordinary cupboard ingredients into something absolutely special.
Ingredients You Will Need
Each ingredient in this Tuna Pasta with Lemon, Capers, and Parmesan Recipe takes center stage, contributing to the dish’s unique flavour. From the vivid lemon zest that awakens your taste buds to the creamy Parmesan that melts into every bite, these essentials are simple, accessible, and necessary.
- 8 ounces spaghetti: Choose your favourite noodle shape, but spaghetti is ideal for holding the sauce.
- 2 tablespoons olive oil: A high-quality olive oil adds richness and enhances the garlic flavour.
- 3 minced garlic cloves: Fresh garlic adds fragrance and richness to the dish.
- 2 (5-ounce) cans tuna, drained: Tuna in water or oil is good; drain to remove excess moisture.
- 1 lemon (zest and juice): Fresh lemon adds acidity and a delightful scent to the recipe.
- ½ teaspoon salt enhances all flavours without dominating them.
- ½ teaspoon pepper: Provides a slight warmth and balance.
- ¼ cup drained capers: These salty bursts of flavour provide richness and pleasure.
- 2 tablespoons fresh parsley: Adds a burst of colour and aromatic freshness both inside and out.
- 2 tablespoons grated Parmesan cheese: Adds a nutty, savoury richness that brings everything together wonderfully.
How to Prepare Tuna Pasta with Lemon, Capers, and Parmesan
Step 1: Cook the pasta al dente
Begin by heating a large pot of salted water and cooking the pasta according to package directions until just al dente. Don’t forget to save around half a cup of pasta water before draining; this starchy liquid is invaluable for loosening the sauce later and allowing the flavours to cling to each strand.
Step 2: Sauté garlic and infuse in oil
While the pasta is cooking, heating the olive oil in a skillet over medium heat. Toss in the minced garlic and sauté for approximately 30 seconds, or until fragrant—this rapid step brings out the garlicky scent without burning it.
Step 3: Combine tuna, lemon, and spice
Next, add the drained tuna, lemon zest, and juice. Season with salt and pepper, and gently toss everything together. This is where the brilliant citrus meets the meaty tuna, resulting in an outstanding flavour combination that sets this Tuna Pasta with Lemon, Capers, and Parmesan Recipe apart.
Step 4: Combine the spaghetti and capers
Return the drained pasta to the saucepan or skillet, add the conserved pasta water, and the capers. Toss everything together for 1–2 minutes over medium heat, so the pasta absorbs the sauce, the tuna warms up, and the capers spread their salty punch evenly.
Step 5: Finish with parsley and parmesan
Turn off the heat and add the chopped fresh parsley and freshly grated Parmesan cheese. The parsley offers a burst of freshness, and the Parmesan melts into a creamy finish that makes every bite delectable. If desired, garnish with additional cheese and parsley. Serve immediately.
How to Serve Tuna Pasta with Lemon, Capers, and Parmesan
Garnishes
Just before serving, sprinkle more chopped parsley and a liberal handful of Parmesan on top for an exquisite finish. A few thin lemon slices can help brighten the plate and provide a burst of fresh flavour with each bite.
Side Dishes
This spaghetti goes great with a crisp green salad prepared lightly with olive oil and vinegar to balance off the richness. Roasted veggies, particularly asparagus and cherry tomatoes, make a colourful, complimentary side dish.
Creative ways to present
For a dinner party, pile the pasta high in shallow bowls, drizzle with extra virgin olive oil, and garnish with toasted pine nuts for crunch. Serving it family-style in a large colourful bowl promotes sharing and conversation around the table.
Make Ahead and Storage
Storing leftovers
Leftover Tuna Pasta with Lemon, Capers, and Parmesan Recipe keeps well in an airtight container in the refrigerator for up to three days. The flavours combine even more, creating a delicious next-day lunch or quick dinner choice.
Freezing
While the spaghetti is tastiest when fresh, leftovers can be frozen in a freezer-safe container. For best freshness, use within 1 month; nevertheless, the pasta’s texture may soften slightly when thawed.
Reheating
Reheat gently in a skillet over low heat, adding a splash of water or broth to replenish moisture. Avoid microwaving on high heat since it can cause the pasta to dry out and the cheese to clump.
FAQs
Can I use different varieties of pasta in this recipe?
Absolutely! Although spaghetti works well, feel free to substitute penne, fusilli, or even farfalle. Simply adjust the cooking time accordingly.
Is canned tuna the greatest option here?
Canned tuna is great for this recipe due to its convenience and flavour. To achieve the finest results, use high-quality tuna in water or olive oil.
What happens if I don’t have capers? Can I skip them?
Capers give a salty, tart flavour, but if you don’t have any, leave them and replace with finely chopped green olives for a little different yet delightful touch.
Can this recipe be made vegan or vegetarian?
To make it vegan, substitute plant-based Parmesan and marinated artichoke hearts or sautéed mushrooms for the tuna to maintain the robust texture.
How can I change the flavours if I’m not a lover of lemon?
If the lemon is too tart for your liking, reduce the amount of lemon juice and zest; you may also add a pinch of crushed red pepper flakes for a different kind of kick.
Final Thoughts
I sincerely hope you give my Tuna Pasta with Lemon, Capers, and Parmesan Recipe a try; it’s one of those recipes that will win you over with each bite. It’s simple to prepare, full of bright, powerful flavours, and incredibly gratifying, making it ideal for any occasion when you want a fantastic supper without the bother. Tonight, enjoy the enchantment of this vivid pasta!
- White Bean Soup Recipe

If you’re looking for a comforting, hearty bowl that feels like a warm hug, this White Bean Soup Recipe is for you. Loaded with soft white beans, fresh veggies, and fragrant herbs, this soup blends simple, healthful ingredients in a way that is both cozy and flavorful. Perfect for any season, it asks you to settle down and relish each healthful mouthful, making it a beloved classic in my kitchen and, hopefully, yours as well.
Ingredients You Will Need
The beauty of this White Bean Soup Recipe is in its simple, fresh ingredients. Each component is important, whether it’s contributing flavor, texture, or a brilliant flash of color to your bowl.
- Olive oil: Used to sauté the veggies and create a smooth basis for the soup.
- A large chopped onion provides a sweet and flavorful basis that softly caramelizes.
- Minced garlic cloves add fragrant depth and a delicate burst of flavor.
- Carrots (chopped): They add natural sweetness and brighten the soup with their orange color.
- Celery stems (chopped): Add a fresh, sharp note to counter the softness of the beans.
- Low-sodium vegetable broth serves as a healthy liquid base, allowing the other tastes to shine without dominating.
- Dried thyme gives the soup a herbal warmth.
- Oregano: Provides a slightly earthy, Mediterranean flavor.
- Salt and black pepper are essential for seasoning and enhancing each ingredient’s natural flavor.
- White beans (canned, drained, and rinsed): The lead ingredient, creamy and hearty, with protein and fiber.
- Baby spinach adds a vibrant green punch to the soup while also providing a delicate, leafy texture.
- Grated parmesan cheese: A finishing touch that adds salty, umami richness.
How to make white bean soup recipe
Step one: Sauté the aromatics and vegetables.
Begin by heating the olive oil in a big pot over medium-high heat until shimmering. Add the chopped onions and gently stir until transparent and soft, about five minutes. Then add the minced garlic, diced carrots, celery, dry thyme, oregano, salt, and black pepper. Cook everything together for another two to three minutes to release the lovely smells and soften the vegetables slightly.
Step 2: Simmer the soup.
Pour in the vegetable broth and the drained white beans. Bring the mixture to a mild boil, then reduce to a low heat and simmer for 15 minutes. This lengthy cooking brings all the flavors together beautifully, softening the beans and allowing the herbs to weave through the broth for a truly pleasant taste.
Step 3: Add Spinach and Finishing Touches
Just before serving, include the baby spinach leaves.. They’ll wilt in approximately two minutes, leaving a wonderful softness and fresh green hue. At this point, taste the soup and add more salt or pepper if needed. If desired, add a sprinkling of grated parmesan cheese on top for a rich, savory finish.
How To Serve White Bean Soup Recipe
Garnishes
Simple garnishes can transform this soup from delicious to outstanding. A sprinkle of freshly chopped parsley or a drizzle of high-quality olive oil boosts brightness and visual appeal. Don’t forget the parmesan cheese—it gives a lovely, melting richness right on top.
Side Dishes
This White Bean Soup pairs nicely with crusty bread or warm dinner rolls, which may be dipped directly into the mug of bliss. A bright green salad or roasted vegetables on the side can help balance the dish and keep it fresh and colorful.
Creative ways to present
For special occasions, serve this soup in elegant bowls or little bread bowls for a rustic look. For an unusual twist, try adding a dab of chile oil or swirling in some pesto. A sprinkle of toasted pine nuts or crispy bacon bits can add a satisfying crunch and contrast in textures.
Make Ahead and Storage
Storing leftovers.
Leftover soup can be refrigerated in an airtight container for up to four days. The flavors actually intensify as it sits, making the leftovers equally as good, if not better.
Freezing
This recipe freezes wonderfully. Pour the chilled soup into freezer-safe containers or bags, leaving some headspace. Freeze for up to three months, making it an excellent meal prep choice for hectic days.
Reheating
When ready to eat, thaw frozen soup overnight in the refrigerator or gently reheat over medium heat on the stovetop, stirring often. If the soup appears too thick, add a splash of broth or water, and sprinkle with fresh parmesan to restore the freshly made feel.
FAQs
Can I use dry white beans instead of canned?
Absolutely! If you’re using dried beans, soak them overnight and boil them thoroughly before adding them to the soup. This requires more labor but results in a lovely texture and flavor.
Is this soup vegetarian/vegan friendly?
By default, yes! To keep it vegan, simply use vegetable broth and leave out the parmesan cheese, or use a vegan cheese option.
Can I add meat to the soup?
Of course. Adding cooked sausage or shredded chicken can make this soup a heartier dinner with a lovely meaty flavor.
What is a good substitute for baby spinach?
Alternatives include kale, Swiss chard, and collard greens, though cooking times may vary slightly depending on the harshness of the greens.
How spicy is the White Bean Soup Recipe?
This soup has a mild warmth from the herbs but is not spicy at all. If you like it spicy, add crushed red pepper flakes or hot sauce.
Final Thoughts
I sincerely hope you try this White Bean Soup Recipe since it is the type of cuisine that warms you from the inside out while being extremely simple to prepare. Whether it’s a busy evening or a relaxing weekend, this soup feels like a warm kitchen hug that you’ll want to return to time and again.